VMware vCloud : This VM has a compliance failure against its Storage Policy.

vCloud PowerCLI


Issue :

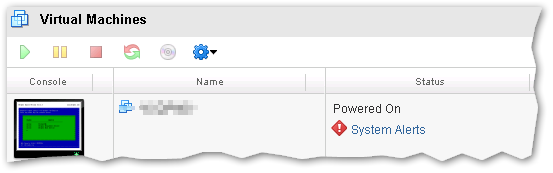
VMs in vCloud Director displays the message : “System alert – This VM has a compliance failure against its Storage Policy.”

Symptoms :

After changing the storage profile of the VM you may observe the following error in ‘Status‘.

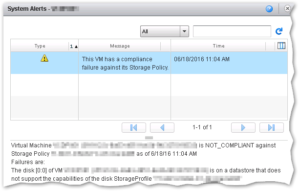
“System alerts – This VM has a compliance failure against its Storage Policy.”

Virtual Machine <VMName>(UUID) is NOT_COMPLIANT against Storage Policy <SP Name> as of 6/18/16 11:04 AM
Failures are:
The disk [0:0] of VM <VMName>(UUID) is on a datastore that does not support the capabilities of the disk StorageProfile <SP Name>

Resolution :

To reset the alarm in the vCloud Director.

Option 1:

  1. Click the System Alert and select ClearAll.

vcd-1


vcd-2


Option 2:

If many VMs have the same alerts then its difficult to clear one by one. In that case we can use SQL statement to clear all alerts.

  1. Log in to the database with Admin credentials using Microsoft SQL Management Studio.
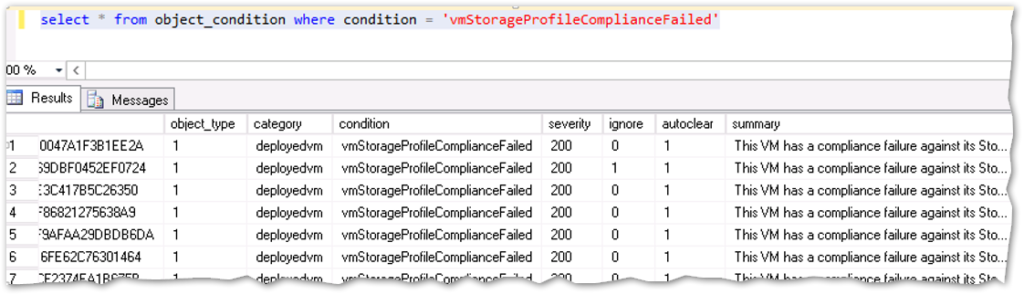
  2. Run this SQL statement to display all virtual machines with the system alert:
    #
    select * from object_condition where condition = 'vmStorageProfileComplianceFailed'
    #

    vcd-3

  3. Run this update statement to clear the alert in the vCD UI:
    #
    update object_condition set ignore = 1 where condition = 'vmStorageProfileComplianceFailed'
    #


PowerCLI to deploy VMs in VMware vCloud and connect to network

vCloud PowerCLI

This PowerCLI script will help you to deploy VMs in VMware Private vCloud and connect to network.


#############################
# Deploy VMs in  vCloud     #
#############################
# Change Log
# 1.0 This script will Create vApp and deploy VMs from the selected TemplateVM.
 
################
# INITIALIZING #
################
 
### DECLARING VARIABLES ###
 
$vCloud_Server = "vCloud Server" # vCloud Server FQDN
$vCloud_Org    =    "Org Name"   # Org Name
$orgNetwork = "orgNwName"        # Target OrgNetworkName for the VM.
$templateVM = "TemplateVMName    # Template VM Name.
$vmCount = 2                     # No of VMs required.
$vmIndex = 4                     # VM starting index.
$vAppNamePrefix =  "RHEL-vApp"   # Prefix string in the vApp Name.
$VMNamePrefix = "RHEL-VM"        # Prefix string in the VM Name.
 
### Connect to the vCloud Server ###
Connect-CIServer $vCloud_Server
 
### Deploying VMs ###
$vmCount = $vmIndex + $vmCount
 
for($i=$vmIndex; $i -le $vmCount; $i++)
{
$vAppName = $vAppNamePrefix+"$i"
$VMName = $VMNamePrefix+"$i"
 
### Creating new vApp ###
New-CIVApp -Name $vAppName -OrgVdc $vCloud_Org
 
### Deploy the VM from template inside the newly created vApp###
New-CIVM -Name "$VMName" -VMTemplate $templateVM -VApp $vAppName -ComputerName "$VMName"
 
### Creating new vApp Network ###
New-CIVAppNetwork -VApp $vAppName -Direct -ParentOrgNetwork $orgNetwork
 
$vAppNetwork = get-civapp $vAppName | Get-CIVAppNetwork $orgNetwork
$cldVMs = get-civapp $vAppName | get-civm
 
### Connecting the vNIC to the network ###
### Please change the allocation model if required###
foreach ($cldvm in $cldVMs) {
    $cldvm | Get-CINetworkAdapter | Set-CINetworkAdapter -vappnetwork $vAppNetwork -IPaddressAllocationMode Pool -Connected $True
}
### Powering on the vApp ###
get-CIVApp -Name $vAppName | Start-CIVApp
}
 
Disconnect-CIServer $vCloud_Server -Force -Confirm:$false


Steps to find NAA ID of a RDM LUN mapped to a Windows Volume

Scenario:

Customer requested to increase the windows volume T:. The mentioned volume is a RAW LUN located in EMC VMAX storage. To expand the LUN storage team needs NAA ID (or WWN) of the LUN.

Its easy to find the naa id of a LUN from windows Guest OS with the help of EMC’s Inquiry (inq) tool. Please find the steps below to fetch the naa id with inq tool.


Steps:

  1. Download the inq tool to the VM from following hyperlink.
    1. inq
  2. Open a CMD window.
    1. Go to RUN -> cmd
  3. CD to the directory where inq is downloaded.
  4. Find the device associated to the windows volume T:.
    1. Run the command inq -winvolwinvol
    2. Here the Device name is PHYSICALDRIVE4.
  5. Find the NAA id of the LUN associated to the Device PHYSICALDRIVE4.
    1. Run the command inq -wwn naa number
    2. You can see that naa id is displayed in WWN column!!!.

To Confirm you can use the following method.

  1. Find virtual device node of the Device.
    1. Run the command inq -btlVirtual
    2. note down the Bus (0) and Tid number (4).
  2. Open VM settings check the NAAID of the disk with Virtual Device Node “0:4”.vm settings - Virtual Devicevm settings - NAA ID

Disclaimer :

I have’nt tested it on all windows platforms and tested only with EMC storages. So use at your own risk.

PowerCLI script to Set Perennial reservation on RDM LUNs in a Cluster

Please find the Powercli script for configuring Perennial reservation on all RDM luns in a ESXi Cluster. Please change the value for following variables before you execute the script.

$vcenter = “vCenter.vmtest.com”
$dCenter = “123456”
$cluster = “Production Hypervisor”

This is the flow of script execution.

1. Get the list of RDM LUNs from the cluster.
2. Check the current perennial reservation status of the RDM. If it’s TRUE, no changes will be applied.
3. If the status is FALSE, the perennial reservation will be set on the LUN.
4. Script will query the latest status and the status will be displayed.

The result, after executing the script, looks something like this.

perinnial reservation


# This script will set the parameter Perennially Reservations to True on RDM Luns in a cluster
#$vcenter = #"vCenter Name "
#$dCenter = #"Datacenter Name"
#$cluster = #"Cluster Name"

$vcenter = "vCenter.vmtest.com"
$dCenter = "123456"
$cluster = "Production Hypervisor"

#-------------------------------------------------------------------------

# Do not modify bellow script
#-------------------------------------------------------------------------

#Add-PSSnapIn VMware* -ErrorAction SilentlyContinue

$connected = Connect-VIServer -Server $vcenter | Out-Null

$clusterInfo = Get-Datacenter -Name $dCenter | get-cluster $cluster
$vmHosts = $clusterInfo | get-vmhost | select -ExpandProperty Name
$RDMNAAs = $clusterInfo | Get-VM | Get-HardDisk -DiskType "RawPhysical","RawVirtual" | Select -ExpandProperty ScsiCanonicalName -Unique

foreach ($vmhost in $vmHosts) {
$myesxcli = Get-EsxCli -VMHost $vmhost

foreach ($naa in $RDMNAAs) {

$diskinfo = $myesxcli.storage.core.device.list("$naa") | Select -ExpandProperty IsPerenniallyReserved
$vmhost + " " + $naa + " " + "IsPerenniallyReserved= " + $diskinfo
if($diskinfo -eq "false")
{
write-host "Configuring Perennial Reservation for LUN $naa......."
$myesxcli.storage.core.device.setconfig($false,$naa,$true)
$diskinfo = $myesxcli.storage.core.device.list("$naa") | Select -ExpandProperty IsPerenniallyReserved
$vmhost + " " + $naa + " " + "IsPerenniallyReserved= " + $diskinfo
}
write-host "----------------------------------------------------------------------------------------------"
}
}

Disconnect-VIServer $vcenter -confirm:$false | Out-Null

Configure Virtual Machine-FEX with Cisco VIC and Nexus 5K – Part 3

In this final part we discuss on the configuration that needs to be done on vCenter to enable VMFEX.

vmware-ciscoFirst step is to install vCenter and login to vCenter as administrator user. Now create a Datacenter where you want to add the hosts which will participate in VM-FEX. In this document, I use the datacenter name DC1.

Configure SVS connection to vCenter

Once the DC is created in vCenter, login to Nexus 5000 Switch using its management IP.

Before starting this configuration, make sure that the Nexus switch management ip is reachable by vCenter server. Following is an example on SVS connection creation.

  1. 1.     configure
  2. 2.     svs connection <svs connection name>
  3. 3.     protocol vmware-vim
  4. 4.     vmware dvs datacenter-name <vCenter datacenter name>
  5. 5.     dvs-name <vCenter DVS name>
  6. 6.     remote ip address <vCenterServer IP> port <vCenter Port> vrf management
  7. 7.     install certificate default
  8. 8.     extention-key cisco_nexus_fex

Example screenshot:
Continue reading

Configure Virtual Machine-FEX with Cisco VIC and Nexus 5K – Part 2

Cisco-VMFEXOnce the configuration on Cisco VIC adapter is done, we need to do certain configuration settings on Nexus switch to enable VM-FEX. In this section we discuss more on the configuration settings that needs to be done specifically on on Nexus 5000 Series switch to enable VM-FEX. We also discuss on settings that needs to be done on ESXi to enable VMFEX.

A VM-FEX license is required for Cisco Nexus device. The license package name is VMFEX_ FEATURE_PKG. Incase if you are just interested in experimenting with this cool feature, a grace period of 120 days starts when you first configure this feature.

We have to do the following configuration on Nexus 5000 switch:

  1. Enable VM-FEX and other related services
  2. Define port profiles for dynamic Virtual Machine ports
  3. Enable vntag on applicable ports
  4. Install Cisco_nexus_vmfex plugin in vCenter
  5. Configure SVS connection to vCenter
  6. Activate and verify the SVS connection

Continue reading

Configure Virtual Machine-FEX with Cisco VIC and Nexus 5K – Part 1

Sick and tired of managing physical and virtual network for your data center from different management interfaces? VMFEX is Cisco’s answer to your problem. Cisco Virtual Machine Fabric Extender (VM-FEX) technology extends cisco’s fabric extender technology to virtual machines. In simpler words, with VMFEX you will be able to manage both physical and virtual network ports from your Nexus 5000.
 
vmware-ciscoThe objective of this article is to help users setup a VMFEX solution very easily in their virtualized environment with Cisco Rack Servers. This document has been divided into 3 parts.

Part 1: Introduction and VIC configurations

Part2: Nexus 5000 configuration

Part 3: ESXi and vCenter configuration
Continue reading

VMware vEXPERT 2014!!

On Monday VMware announced the complete list of vExpert 2014. This year 754 people were named as vExpert. I am one among them!! humbled!!.

vExpert 2014

For those unknown with the term: “vExpert” is not a technical certification or a general measure of VMware expertise. The annual VMware vExpert title is given to individuals who have significantly contributed to the community of VMware users over the past year. The title is awarded to individuals (not employers) for their commitment to sharing their knowledge and passion for VMware technology above and beyond their job requirements. Here is the complete list of vExperts 2014.

If you feel you have contributed to the VMware community and did not apply for vExpert, good news.. the Q2 applications are already open at http://www.jotformpro.com/form/40285638168967. Good luck!

ESXi bash script to automate Power ON VM if its Powered OFF

This script with the help of crontab will enable ESXi 5.1 to poll the VM state every hour to check if it is ON and if not power it ON.

1. SSH to the host.
2. Copy and paste the following content to the shell script (auto-poweron.sh) which is placed in a vmfs volume.

Eg :-
Having enabled ssh access to your ESXi server, ssh in as root.
~ #vi /vmfs/volumes/datastore1/auto-poweron.sh

[crayon lang=”shell”]
vmname=”testvm”
vmid=$(vim-cmd vmsvc/getallvms | grep “$vmname” | awk ‘{print $1}’)
stat1=$(vim-cmd vmsvc/power.getstate “$vmid” | grep “off”)
if [ “$stat1” == “Powered off” ]
then
vim-cmd vmsvc/power.on “$vmid”
fi
[/crayon]

3. Replace ‘testvm’ with the appropriate vmName.
Continue reading