Upgrade VMware Cloud Director App Launchpad from 2.0 to 2.1

Please find the steps to upgrade VMware Cloud Director App Launchpad from version 2.0 to 2.1

  1. Download VMware Cloud Director App Launchpad 2.1 RPM package from here.
  2. Upload it to the App Launchpad VM.
  3. Open an SSH connection to the App Launchpad VM and log in as root.
  4. Upgrade the RPM package.
[root@test ~]# rpm -U vmware-alp-2.1.0-18834930.x86_64.rpm
warning: vmware-alp-2.1.0-18834930.x86_64.rpm: Header V3 RSA/SHA1 Signature, key ID 001e5cc9: NOKEY
Upgrading...

Execute 'alp upgrade' to upgrade ...

  Append the excute permission to the existing logs...

5. Run the following command to upgrade App Launchpad.

[root@test ~]# alp upgrade --admin-user administrator@system --admin-pass 'passwd'
Upgraded the plugin of App Launchpad successfully.

Upgraded the management service successfully.
  [Upgrade Task]
     CREATE_ENTITY_TYPE_CATALOG_INFO : true
     MIGRATE_CATALOGS : true
     CREATE_ENTITY_TYPE_SIZING_TEMPLATE : true
     MIGRATE_LEGACY_SIZING_TEMPLATES : true
     CREATE_ENTITY_TYPE_MARKETPLACE_BANNER : true
     CREATE_ENTITY_TYPE_ORG_METRICS : true
     UPGRADE_SERVICE_ROLE : true

6. Restart alp service and confirm its running.

[root@test~]# systemctl restart alp
[root@test ~]# systemctl status alp
● alp.service - VMware ALP Management Service
   Loaded: loaded (/usr/lib/systemd/system/alp.service; enabled; vendor preset: disabled)
   Active: active (running) since Thu 2021-11-18 11:46:14 +01; 14s ago
 Main PID: 29334 (java)
   CGroup: /system.slice/alp.service
           └─29334 java -jar /opt/vmware/alp/alp.jar --logging.path=log

Nov 18 11:46:14 bd1-srp-al01.acs.local systemd[1]: Stopped VMware ALP Management Service.
Nov 18 11:46:14 bd1-srp-al01.acs.local systemd[1]: Started VMware ALP Management Service.

7. Diagnose deployment errors by running the /opt/vmware/alp/bin/diagnose executable file.

The diagnose tool verifies that the services are up and running and that all configuration
requirements are met.

[root@test ~]# /opt/vmware/alp/bin/diagnose

Step 1: System diagnose
--------------------------------------------------------------------------------
- App Launchpad service is initialized.


Step 2: Cloud Director diagnose
--------------------------------------------------------------------------------
- Service Account for App Launchpad is good.
- App Launchpad's extension is ready.


Step 3: MQTT diagnose
--------------------------------------------------------------------------------
- Cloud Director MQTT for extensibility is ready.


Step 4: Integration diagnose
--------------------------------------------------------------------------------
- App Launchpad API is up, and version is 2.1.0-18834930.


Step 5: App Launchpad diagnose
--------------------------------------------------------------------------------
- App Launchpad service is listening on port 8086.


8. Confirm the ALP version.

[root@test ~]# alp
NAME:
        alp - The Cloud Director App Launchpad
        (ALP) Command-line tool

USAGE:
        alp <subcommand> [flags]

VERSION:
        '2.1.0-18834930'

VMware vCloud : This VM has a compliance failure against its Storage Policy.

vCloud PowerCLI


Issue :

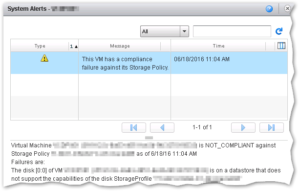
VMs in vCloud Director displays the message : “System alert – This VM has a compliance failure against its Storage Policy.”

Symptoms :

After changing the storage profile of the VM you may observe the following error in ‘Status‘.

“System alerts – This VM has a compliance failure against its Storage Policy.”

Virtual Machine <VMName>(UUID) is NOT_COMPLIANT against Storage Policy <SP Name> as of 6/18/16 11:04 AM
Failures are:
The disk [0:0] of VM <VMName>(UUID) is on a datastore that does not support the capabilities of the disk StorageProfile <SP Name>

Resolution :

To reset the alarm in the vCloud Director.

Option 1:

  1. Click the System Alert and select ClearAll.

vcd-1


vcd-2


Option 2:

If many VMs have the same alerts then its difficult to clear one by one. In that case we can use SQL statement to clear all alerts.

  1. Log in to the database with Admin credentials using Microsoft SQL Management Studio.
  2. Run this SQL statement to display all virtual machines with the system alert:
    #
    select * from object_condition where condition = 'vmStorageProfileComplianceFailed'
    #

    vcd-3

  3. Run this update statement to clear the alert in the vCD UI:
    #
    update object_condition set ignore = 1 where condition = 'vmStorageProfileComplianceFailed'
    #


PowerCLI to deploy VMs in VMware vCloud and connect to network

vCloud PowerCLI

This PowerCLI script will help you to deploy VMs in VMware Private vCloud and connect to network.


#############################
# Deploy VMs in  vCloud     #
#############################
# Change Log
# 1.0 This script will Create vApp and deploy VMs from the selected TemplateVM.
 
################
# INITIALIZING #
################
 
### DECLARING VARIABLES ###
 
$vCloud_Server = "vCloud Server" # vCloud Server FQDN
$vCloud_Org    =    "Org Name"   # Org Name
$orgNetwork = "orgNwName"        # Target OrgNetworkName for the VM.
$templateVM = "TemplateVMName    # Template VM Name.
$vmCount = 2                     # No of VMs required.
$vmIndex = 4                     # VM starting index.
$vAppNamePrefix =  "RHEL-vApp"   # Prefix string in the vApp Name.
$VMNamePrefix = "RHEL-VM"        # Prefix string in the VM Name.
 
### Connect to the vCloud Server ###
Connect-CIServer $vCloud_Server
 
### Deploying VMs ###
$vmCount = $vmIndex + $vmCount
 
for($i=$vmIndex; $i -le $vmCount; $i++)
{
$vAppName = $vAppNamePrefix+"$i"
$VMName = $VMNamePrefix+"$i"
 
### Creating new vApp ###
New-CIVApp -Name $vAppName -OrgVdc $vCloud_Org
 
### Deploy the VM from template inside the newly created vApp###
New-CIVM -Name "$VMName" -VMTemplate $templateVM -VApp $vAppName -ComputerName "$VMName"
 
### Creating new vApp Network ###
New-CIVAppNetwork -VApp $vAppName -Direct -ParentOrgNetwork $orgNetwork
 
$vAppNetwork = get-civapp $vAppName | Get-CIVAppNetwork $orgNetwork
$cldVMs = get-civapp $vAppName | get-civm
 
### Connecting the vNIC to the network ###
### Please change the allocation model if required###
foreach ($cldvm in $cldVMs) {
    $cldvm | Get-CINetworkAdapter | Set-CINetworkAdapter -vappnetwork $vAppNetwork -IPaddressAllocationMode Pool -Connected $True
}
### Powering on the vApp ###
get-CIVApp -Name $vAppName | Start-CIVApp
}
 
Disconnect-CIServer $vCloud_Server -Force -Confirm:$false