vi /etc/systemd/system/cse.service
[Unit]
Description=Container Service Extension for VMware Cloud Director

[Service]
ExecStart=/opt/vmware/cse/cse.sh
User=root
WorkingDirectory=/opt/vmware/cse
Type=simple
Restart=always

[Install]
WantedBy=default.target
# systemctl status cse.service
  cse.service - Container Service Extension for VMware Cloud Director
   Loaded: loaded (/etc/systemd/system/cse.service; enabled; vendor preset: disabled)
   Active: active (running) since Wed 2021-11-24 14:43:56 +01; 1min 9s ago
 Main PID: 770 (bash)
   CGroup: /system.slice/cse.service
           ├─770 bash /opt/vmware/cse/cse.sh
           └─775 /usr/local/bin/python3.7 /usr/local/bin/cse run

Nov 24 14:44:06 cse01.lab.com cse.sh[770]: Validating CSE installation according to config file
Nov 24 14:44:06  cse.sh[770]: MQTT extension and API filters found
Nov 24 14:44:06 cse01.lab.com cse.sh[770]: Found catalog 'cse-site1-k8s'
Nov 24 14:44:06 cse01.lab.com  cse.sh[770]: CSE installation is valid
Nov 24 14:44:06 cse01.lab.com cse.sh[770]: Started thread 'MessageConsumer' (140229531580160)
Nov 24 14:44:06 cse01.lab.com l cse.sh[770]: Started thread 'ConsumerWatchdog' (140229523187456)
Nov 24 14:44:06 cse01.lab.com  cse.sh[770]: Container Service Extension for vCloud Director
Nov 24 14:44:06 cse01.lab.com  cse.sh[770]: Server running using config file: /opt/vmware/cse/encrypted-config.yaml
Nov 24 14:44:06 cse01.lab.com  cse.sh[770]: Log files: /root/.cse-logs/cse-server-info.log, /root/.cse-logs/cse-server-debug.log
Nov 24 14:44:06 cse01.lab.com  cse.sh[770]: waiting for requests (ctrl+c to close)
I’ve downloaded Ubuntu 2004 Kubernetes v1.21.2 OVA since that’s the lates available version. File Name : ubuntu-2004-kube-v1.21.2+vmware.1-tkg.1-7832907791984498322.ova
Step2: Import TKG OVA to VCD Catalog
Upload the downloaded OVA to the CSE server. Use the following command to import the OVA in Catalog.
# cse template import -c encrypted-config.yaml -F ubuntu-2004-kube-v1.21.2+vmware.1-tkg.1-7832907791984498322.ova

Required Python version: >= 3.7.3
Installed Python version: 3.7.12 (default, Nov 23 2021, 15:49:55)
[GCC 4.8.5 20150623 (Red Hat 4.8.5-44)]
Password for config file decryption:
Decrypting 'encrypted-config.yaml'
Validating config file 'encrypted-config.yaml'
InsecureRequestWarning: Unverified HTTPS request is being made. Adding certificate verification is strongly advised.
Connected to vCloud Director (vcd.lab.com:443)
Connected to vCenter Server 'demovc.local' as '[email protected]' (demovc.local)
Config file 'encrypted-config.yaml' is valid
Uploading 'ubuntu-2004-kube-v1.21.2+vmware.1-tkg.1-7832907791984498322' to catalog 'cse-site1-k8s'
Uploaded 'ubuntu-2004-kube-v1.21.2+vmware.1-tkg.1-7832907791984498322' to catalog 'cse-site1-k8s'
Writing metadata onto catalog item ubuntu-2004-kube-v1.21.2+vmware.1-tkg.1-7832907791984498322.
Successfully imported TKGm OVA.
Step3: Restart CSE service.
I assume you’ve configured CSE to run as service. If yest restart the service.
Step4: Confirm TKG is available as option for Kubernetes Runtime
Login to the tenant portal and navigate to More > Kubernetes Container Clusters.
Please find the steps to deploy Container Service Extension 3.1.1.
Step 1: Deploy CentOS 7 VM
Selected CentOS 7 as the Operating System for CSE server. CentOS 7 has higher EOL than CentOS 8. You can find the installations steps for CentOS 7 here.
Please find more details on CentOS releases below.
Kindly ensure following configurations are done in CSE VM.
Configure DNS.
Configure NTP.
Configure SSH.
SSH access for root user is enabled.
Please note the following network connections are required for rest of the configurations.
Access to VCD URL (https) from CSE Server.
The Internet access from CSE server.
Step 2: Take a snapshot of CSE server VM.
It’s recommended to take a snapshot of CSE server before continuing with Python installation. It’s an optional step.
Step 3: Install Python 3.7.3 or greater
Install python 3.7.3 or greater in 3.7.x series. Please note that python 3.8.0 and above is not supported (ref: CSE doc) The built-in python version in CentOS 7 is 2.7. So, we’ve to install the latest in 3.7.x series, at the moment version 3.7.12 is the latest. Please follow the below steps to install Python.
yum update -y
yum install -y yum-utils
yum groupinstall -y development
yum install -y gcc openssl-devel bzip2-devel libffi-devel zlib-devel xz-devel

#Install sqlite3

cd /tmp/
curl -O https://www.sqlite.org/2020/sqlite-autoconf-3310100.tar.gz
tar xvf sqlite-autoconf-3310100.tar.gz
cd sqlite-autoconf-3310100/
./configure
make install

# Install Python

cd /tmp/
curl -O https://www.python.org/ftp/python/3.7.12/Python-3.7.12.tgz
tar -xvf Python-3.7.12.tgz
cd Python-3.7.12
./configure --enable-optimizations
make altinstall
alternatives --install /usr/bin/python3 python3 /usr/local/bin/python3.7 1
alternatives --install /usr/bin/pip3 pip3 /usr/local/bin/pip3.7 1
alternatives --list

# Check Python and pip3 versions

python3 --version
pip3 --version
Step 4: Install vcd-cli
# Install and verify vcd-cli
pip3 install vcd-cli
vcd version
     vcd-cli, VMware vCloud Director Command Line Interface, 24.0.1
Step 5: Install CSE
# Install and verify cse
pip3 install container-service-extension
cse version
CSE, Container Service Extension for VMware vCloud Director, version 3.1.1
Step 7: Create CSE Service Role for CSE server management
[root@test ~]# cse create-service-role <vcd fqdn> -s
Username for System Administrator: administrator
Password for administrator:
Connecting to vCD:  <vcd fqdn>
Connected to vCD as system administrator: administrator
Creating CSE Service Role...
Successfully created CSE Service Role
Step 7: Create service account for CSE in VCD
Create a Service Account in VCD with the role ‘CSE Service Role’
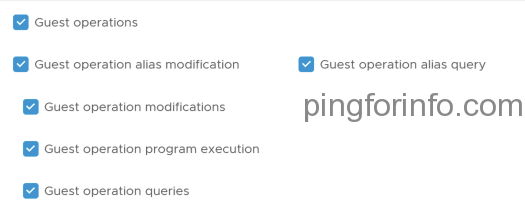
Step 8: Create service account for CSE in vCenter
Create new role in vCenter with Power User + Guest Operations privilege. Assign the role to the service account for CSE.
Clone ‘Virtual Machine Power User (sample) role
Edit role
Select Virtual machine > Guest operations.
Step 9: Create a sample CSE config file and update it.
It will take a while to complete the download of template, be patient.
Downloading file from 'https://cloud-images.ubuntu.com/releases/xenial/release-20180418/ubuntu-16.04-server-cloudimg-amd64.ova' to 'cse_cache/ubuntu-16.04-server-cloudimg-amd64.ova'...
Download complete
Uploading 'ubuntu-16.04-server-cloudimg-amd64.ova' to catalog 'cse-site1-k8s'
Uploaded 'ubuntu-16.04-server-cloudimg-amd64.ova' to catalog 'cse-site1-k8s'
Deleting temporary vApp 'ubuntu-16.04_k8-1.21_weave-2.8.1_temp'
Creating vApp 'ubuntu-16.04_k8-1.21_weave-2.8.1_temp'
Found data file: /root/.cse_scripts/2.0.0/ubuntu-16.04_k8-1.21_weave-2.8.1_rev1/init.sh
Created vApp 'ubuntu-16.04_k8-1.21_weave-2.8.1_temp'
Customizing vApp 'ubuntu-16.04_k8-1.21_weave-2.8.1_temp', vm 'ubuntu-1604-k8s1212-weave281-vm'
Found data file: /root/.cse_scripts/2.0.0/ubuntu-16.04_k8-1.21_weave-2.8.1_rev1/cust.sh
Waiting for guest tools, status: "vm='vim.VirtualMachine:vm-2296', status=guestToolsNotRunning
Waiting for guest tools, status: "vm='vim.VirtualMachine:vm-2296', status=guestToolsNotRunning
Waiting for guest tools, status: "vm='vim.VirtualMachine:vm-2296', status=guestToolsNotRunning
Waiting for guest tools, status: "vm='vim.VirtualMachine:vm-2296', status=guestToolsRunning
.....
......
......

waiting for process 1611 on vm 'vim.VirtualMachine:vm-2296' to finish (1)
waiting for process 1611 on vm 'vim.VirtualMachine:vm-2296' to finish (2)
waiting for process 1611 on vm 'vim.VirtualMachine:vm-2296' to finish (3)
waiting for process 1611 on vm 'vim.VirtualMachine:vm-2296' to finish (4)
waiting for process 1611 on vm 'vim.VirtualMachine:vm-2296' to finish (5)
waiting for process 1611 on vm 'vim.VirtualMachine:vm-2296' to finish (6)
waiting for process 1611 on vm 'vim.VirtualMachine:vm-2296' to finish (7)
waiting for process 1611 on vm 'vim.VirtualMachine:vm-2296' to finish (8)
...
...
..
/etc/kernel/postinst.d/x-grub-legacy-ec2:
Searching for GRUB installation directory ... found: /boot/grub
Searching for default file ... found: /boot/grub/default
Testing for an existing GRUB menu.lst file ... found: /boot/grub/menu.lst
Searching for splash image ... none found, skipping ...
Found kernel: /boot/vmlinuz-4.4.0-119-generic
Found kernel: /boot/vmlinuz-4.4.0-210-generic
Found kernel: /boot/vmlinuz-4.4.0-119-generic
Updating /boot/grub/menu.lst ... done

/etc/kernel/postinst.d/zz-update-grub:
Generating grub configuration file ...
Found linux image: /boot/vmlinuz-4.4.0-210-generic
Found initrd image: /boot/initrd.img-4.4.0-210-generic
Found linux image: /boot/vmlinuz-4.4.0-119-generic
Found initrd image: /boot/initrd.img-4.4.0-119-generic
done
customization completed

Customized vApp 'ubuntu-16.04_k8-1.21_weave-2.8.1_temp', vm 'ubuntu-1604-k8s1212-weave281-vm'
Creating K8 template 'ubuntu-16.04_k8-1.21_weave-2.8.1_rev1' from vApp 'ubuntu-16.04_k8-1.21_weave-2.8.1_temp'
Shutting down vApp 'ubuntu-16.04_k8-1.21_weave-2.8.1_temp'
Successfully shut down vApp 'ubuntu-16.04_k8-1.21_weave-2.8.1_temp'
Capturing template 'ubuntu-16.04_k8-1.21_weave-2.8.1_rev1' from vApp 'ubuntu-16.04_k8-1.21_weave-2.8.1_temp'
Created K8 template 'ubuntu-16.04_k8-1.21_weave-2.8.1_rev1' from vApp 'ubuntu-16.04_k8-1.21_weave-2.8.1_temp'
Successfully tagged template ubuntu-16.04_k8-1.21_weave-2.8.1_rev1 with placement policy native.
Deleting temporary vApp 'ubuntu-16.04_k8-1.21_weave-2.8.1_temp'
Deleted temporary vApp 'ubuntu-16.04_k8-1.21_weave-2.8.1_temp'
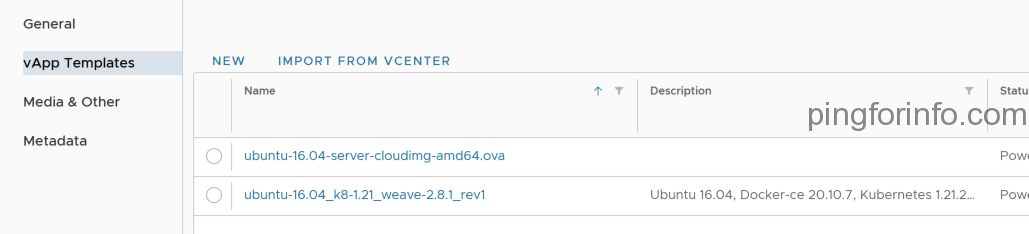
Step 12: Confirm the template is available in CSE catalog
Login to CSE Tenant portal. Navigate to the Libraries > Catalogs > vApp Templates. We can see the newly created K8S upstream template.
Step 13: Enable Organizations for Native deployments.
The provider must explicitly enable organizational virtual datacenter(s) to host native deployments, by running the command: vcd cse ovdc enable.
vcd login <vcd> system administrator -i
InsecureRequestWarning: Unverified HTTPS request is being made. Adding certificate verification is strongly advised.
Password:
administrator logged in, org: 'system', vdc: ''

# vcd cse ovdc enable <orgvdc> -n -o <organization>
# vcd cse ovdc enable TEST-OVDC -n -o Site1-Test

InsecureRequestWarning: Unverified HTTPS request is being made. Adding certificate verification is strongly advised.
OVDC Update: Updating OVDC placement policies
task: 10e70b37-5aa6-4cf9-b437-ef478bd9f06a, Operation success, result: success
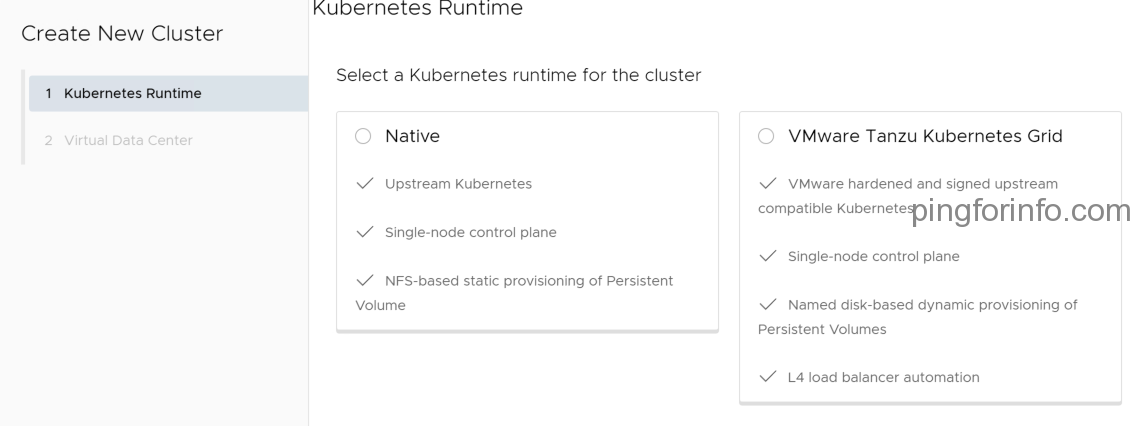
Step 14: Check Create New Native Cluster is available now
Login to the VCD Tenant portal and navigate to More > Kubernetes Container Clusters. Click on New.
We can see the option to ‘Create New Native Cluster’.
Step 15: Publish Right Bundle ‘cse:nativeCluster Entitlement’
The following article has details on differences between right bundle and roles.