Please find the steps to deploy Container Service Extension 3.1.1.
Step 1: Deploy CentOS 7 VM
Selected CentOS 7 as the Operating System for CSE server. CentOS 7 has higher EOL than CentOS 8. You can find the installations steps for CentOS 7 here.
Please find more details on CentOS releases below.
Kindly ensure following configurations are done in CSE VM.
- Configure DNS.
- Configure NTP.
- Configure SSH.
- SSH access for root user is enabled.
Please note the following network connections are required for rest of the configurations.
- Access to VCD URL (https) from CSE Server.
- The Internet access from CSE server.
Step 2: Take a snapshot of CSE server VM.
It’s recommended to take a snapshot of CSE server before continuing with Python installation. It’s an optional step.
Step 3: Install Python 3.7.3 or greater
Install python 3.7.3 or greater in 3.7.x series. Please note that python 3.8.0 and above is not supported (ref: CSE doc)
The built-in python version in CentOS 7 is 2.7. So, we’ve to install the latest in 3.7.x series, at the moment version 3.7.12 is the latest. Please follow the below steps to install Python.
yum update -y
yum install -y yum-utils
yum groupinstall -y development
yum install -y gcc openssl-devel bzip2-devel libffi-devel zlib-devel xz-devel

#Install sqlite3

cd /tmp/
curl -O https://www.sqlite.org/2020/sqlite-autoconf-3310100.tar.gz
tar xvf sqlite-autoconf-3310100.tar.gz
cd sqlite-autoconf-3310100/
./configure
make install

# Install Python

cd /tmp/
curl -O https://www.python.org/ftp/python/3.7.12/Python-3.7.12.tgz
tar -xvf Python-3.7.12.tgz
cd Python-3.7.12
./configure --enable-optimizations
make altinstall
alternatives --install /usr/bin/python3 python3 /usr/local/bin/python3.7 1
alternatives --install /usr/bin/pip3 pip3 /usr/local/bin/pip3.7 1
alternatives --list

# Check Python and pip3 versions

python3 --version
pip3 --version
Step 4: Install vcd-cli
# Install and verify vcd-cli
pip3 install vcd-cli
vcd version
     vcd-cli, VMware vCloud Director Command Line Interface, 24.0.1
Step 5: Install CSE
# Install and verify cse
pip3 install container-service-extension
cse version
CSE, Container Service Extension for VMware vCloud Director, version 3.1.1
Step 6: Enable CSE client
# Create ~/.vcd-cli directory
mkdir ~/.vcd-cli

# Create profiles.yaml
cat > ~/.vcd-cli/profiles.yaml << EOF
extensions:
- container_service_extension.client.cse
EOF
Step 7: Create CSE Service Role for CSE server management
[root@test ~]# cse create-service-role <vcd fqdn> -s
Username for System Administrator: administrator
Password for administrator:
Connecting to vCD:  <vcd fqdn>
Connected to vCD as system administrator: administrator
Creating CSE Service Role...
Successfully created CSE Service Role
Step 7: Create service account for CSE in VCD
Create a Service Account in VCD with the role ‘CSE Service Role’

Step 8: Create service account for CSE in vCenter
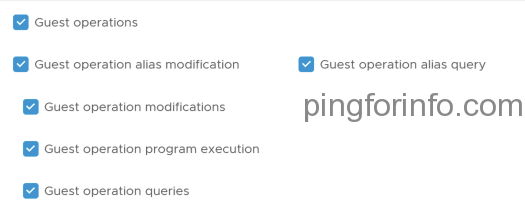
Create new role in vCenter with Power User + Guest Operations privilege. Assign the role to the service account for CSE.
- Clone ‘Virtual Machine Power User (sample) role
- Edit role
- Select Virtual machine > Guest operations.
Step 9: Create a sample CSE config file and update it.
cse sample -o config.yaml
# vi config.yaml
mqtt:
  verify_ssl: false

vcd:
  host: vcd.vmware.com
  log: true
  password: my_secret_password
  port: 443
  username: administrator
  verify: false

vcs:
- name: vc1
  password: my_secret_password
  username: [email protected]
  verify: false

service:
  enforce_authorization: false
  legacy_mode: false
  log_wire: false
  no_vc_communication_mode: false
  processors: 15
  telemetry:
    enable: true

broker:
  catalog: cse
  ip_allocation_mode: pool
  network: my_network
  org: my_org
  remote_template_cookbook_url: https://raw.githubusercontent.com/vmware/container-service-extension-templates/master/template_v2.yaml
  storage_profile: '*'
Step 7: Encrypt Configuration file
cse encrypt config.yaml --output encrypted-config.yaml
Step 8: Validate the Configuration file
chmod 600 encrypted-config.yaml
cse check encrypted-config.yaml
Step 9: Install CSE
cse install -c encrypted-config.yaml --skip-template-creation
Step 10: Validate CSE Installation
cse check encrypted-config.yaml --check-install
Step 10: List the available templates
# cse template list -c encrypted-config.yaml
Password for config file decryption:
Decrypting 'encrypted-config.yaml'
Retrieved config from 'encrypted-config.yaml'
name                                revision  local    remote      cpu    memory  description                                                        deprecated
--------------------------------  ----------  -------  --------  -----  --------  -----------------------------------------------------------------  ------------
ubuntu-16.04_k8-1.21_weave-2.8.1           1  No       Yes           2      2048  Ubuntu 16.04, Docker-ce 20.10.7, Kubernetes 1.21.2, weave 2.8.1    No
ubuntu-16.04_k8-1.20_weave-2.6.5           2  No       Yes           2      2048  Ubuntu 16.04, Docker-ce 19.03.15, Kubernetes 1.20.6, weave 2.6.5   No
ubuntu-16.04_k8-1.19_weave-2.6.5           2  No       Yes           2      2048  Ubuntu 16.04, Docker-ce 19.03.12, Kubernetes 1.19.3, weave 2.6.5   No
ubuntu-16.04_k8-1.18_weave-2.6.5           2  No       Yes           2      2048  Ubuntu 16.04, Docker-ce 19.03.12, Kubernetes 1.18.6, weave 2.6.5   No
photon-v2_k8-1.14_weave-2.5.2              4  No       Yes           2      2048  PhotonOS v2, Docker-ce 18.06.2-6, Kubernetes 1.14.10, weave 2.5.2  Yes
Step 11: Import the latest K8S template
cse template install TEMPLATE_NAME TEMPLATE_REVISION

# cse template install ubuntu-16.04_k8-1.21_weave-2.8.1 1 -c encrypted-config.yaml
It will take a while to complete the download of template, be patient.
Downloading file from 'https://cloud-images.ubuntu.com/releases/xenial/release-20180418/ubuntu-16.04-server-cloudimg-amd64.ova' to 'cse_cache/ubuntu-16.04-server-cloudimg-amd64.ova'...
Download complete
Uploading 'ubuntu-16.04-server-cloudimg-amd64.ova' to catalog 'cse-site1-k8s'
Uploaded 'ubuntu-16.04-server-cloudimg-amd64.ova' to catalog 'cse-site1-k8s'
Deleting temporary vApp 'ubuntu-16.04_k8-1.21_weave-2.8.1_temp'
Creating vApp 'ubuntu-16.04_k8-1.21_weave-2.8.1_temp'
Found data file: /root/.cse_scripts/2.0.0/ubuntu-16.04_k8-1.21_weave-2.8.1_rev1/init.sh
Created vApp 'ubuntu-16.04_k8-1.21_weave-2.8.1_temp'
Customizing vApp 'ubuntu-16.04_k8-1.21_weave-2.8.1_temp', vm 'ubuntu-1604-k8s1212-weave281-vm'
Found data file: /root/.cse_scripts/2.0.0/ubuntu-16.04_k8-1.21_weave-2.8.1_rev1/cust.sh
Waiting for guest tools, status: "vm='vim.VirtualMachine:vm-2296', status=guestToolsNotRunning
Waiting for guest tools, status: "vm='vim.VirtualMachine:vm-2296', status=guestToolsNotRunning
Waiting for guest tools, status: "vm='vim.VirtualMachine:vm-2296', status=guestToolsNotRunning
Waiting for guest tools, status: "vm='vim.VirtualMachine:vm-2296', status=guestToolsRunning
.....
......
......

waiting for process 1611 on vm 'vim.VirtualMachine:vm-2296' to finish (1)
waiting for process 1611 on vm 'vim.VirtualMachine:vm-2296' to finish (2)
waiting for process 1611 on vm 'vim.VirtualMachine:vm-2296' to finish (3)
waiting for process 1611 on vm 'vim.VirtualMachine:vm-2296' to finish (4)
waiting for process 1611 on vm 'vim.VirtualMachine:vm-2296' to finish (5)
waiting for process 1611 on vm 'vim.VirtualMachine:vm-2296' to finish (6)
waiting for process 1611 on vm 'vim.VirtualMachine:vm-2296' to finish (7)
waiting for process 1611 on vm 'vim.VirtualMachine:vm-2296' to finish (8)
...
...
..
/etc/kernel/postinst.d/x-grub-legacy-ec2:
Searching for GRUB installation directory ... found: /boot/grub
Searching for default file ... found: /boot/grub/default
Testing for an existing GRUB menu.lst file ... found: /boot/grub/menu.lst
Searching for splash image ... none found, skipping ...
Found kernel: /boot/vmlinuz-4.4.0-119-generic
Found kernel: /boot/vmlinuz-4.4.0-210-generic
Found kernel: /boot/vmlinuz-4.4.0-119-generic
Updating /boot/grub/menu.lst ... done

/etc/kernel/postinst.d/zz-update-grub:
Generating grub configuration file ...
Found linux image: /boot/vmlinuz-4.4.0-210-generic
Found initrd image: /boot/initrd.img-4.4.0-210-generic
Found linux image: /boot/vmlinuz-4.4.0-119-generic
Found initrd image: /boot/initrd.img-4.4.0-119-generic
done
customization completed

Customized vApp 'ubuntu-16.04_k8-1.21_weave-2.8.1_temp', vm 'ubuntu-1604-k8s1212-weave281-vm'
Creating K8 template 'ubuntu-16.04_k8-1.21_weave-2.8.1_rev1' from vApp 'ubuntu-16.04_k8-1.21_weave-2.8.1_temp'
Shutting down vApp 'ubuntu-16.04_k8-1.21_weave-2.8.1_temp'
Successfully shut down vApp 'ubuntu-16.04_k8-1.21_weave-2.8.1_temp'
Capturing template 'ubuntu-16.04_k8-1.21_weave-2.8.1_rev1' from vApp 'ubuntu-16.04_k8-1.21_weave-2.8.1_temp'
Created K8 template 'ubuntu-16.04_k8-1.21_weave-2.8.1_rev1' from vApp 'ubuntu-16.04_k8-1.21_weave-2.8.1_temp'
Successfully tagged template ubuntu-16.04_k8-1.21_weave-2.8.1_rev1 with placement policy native.
Deleting temporary vApp 'ubuntu-16.04_k8-1.21_weave-2.8.1_temp'
Deleted temporary vApp 'ubuntu-16.04_k8-1.21_weave-2.8.1_temp'
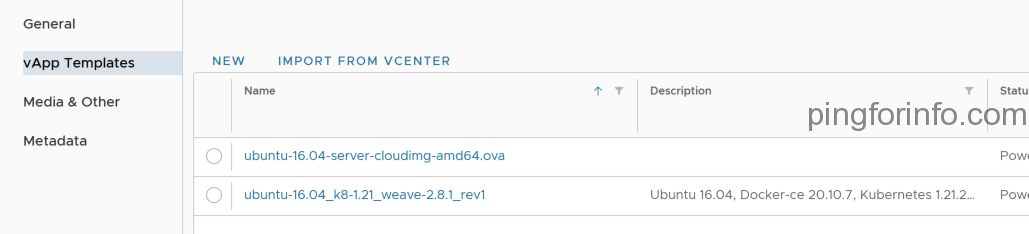
Step 12: Confirm the template is available in CSE catalog
Login to CSE Tenant portal.
Navigate to the Libraries > Catalogs > vApp Templates. We can see the newly created K8S upstream template.
Step 13: Enable Organizations for Native deployments.
The provider must explicitly enable organizational virtual datacenter(s) to host native deployments, by running the command: vcd cse ovdc enable.
vcd login <vcd> system administrator -i
InsecureRequestWarning: Unverified HTTPS request is being made. Adding certificate verification is strongly advised.
Password:
administrator logged in, org: 'system', vdc: ''

# vcd cse ovdc enable <orgvdc> -n -o <organization>
# vcd cse ovdc enable TEST-OVDC -n -o Site1-Test

InsecureRequestWarning: Unverified HTTPS request is being made. Adding certificate verification is strongly advised.
OVDC Update: Updating OVDC placement policies
task: 10e70b37-5aa6-4cf9-b437-ef478bd9f06a, Operation success, result: success
Step 14: Check Create New Native Cluster is available now
Login to the VCD Tenant portal and navigate to More > Kubernetes Container Clusters.
Click on New.
We can see the option to ‘Create New Native Cluster’.
Step 15: Publish Right Bundle ‘cse:nativeCluster Entitlement’
- The following article has details on differences between right bundle and roles.
- Login to VCD as Provider and navigate to Administration > Right Bundles
- Select ‘cse:nativeCluster Entitlement’
- Create a backup of right bundle by Cloning.
- Select the Rights Bundle cse:nativeCluster Entitlement.
- Select Clone.
- Keep the auto generaed name ‘Clone:cse:nativeCluster Entitlement’
- Edit the right bundle cse:nativeCluster Entitlement
- Select the following rights


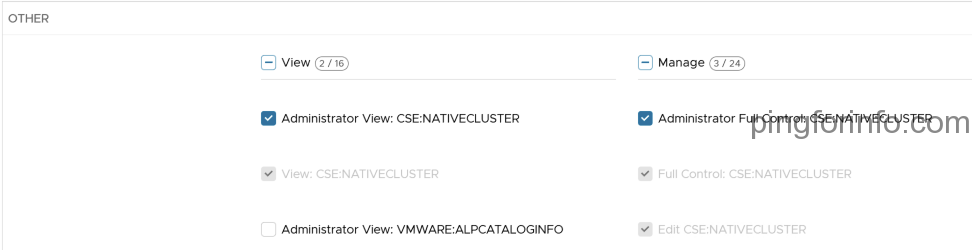
- Select ‘PUBLISH’
- Select the specific Tenants from the list.
Step 16: Add CSE rights to Global Role ‘Organization Administrator’
- Login as Provider and edit the Global Role ‘Organization Administrator’
- Select same rights we selected in the last step.