In CSE 3.1.1, delete operation on a cluster (Native or TKG) that is in an error state (RDE.state = RESOLUTION_ERROR (or) status.phase = :FAILED), may fail with Bad request (400) or the Delete process will be stuck in ‘DELETEIN_PROGRESS’ state. The steps are given below to resolve the issue.
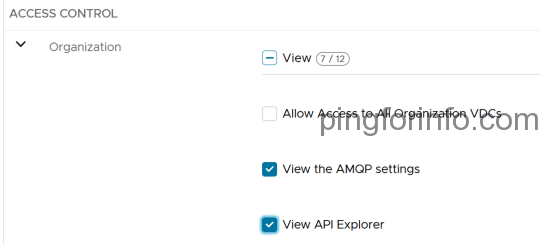
Step1: Assign API explorer privilege to the CSE Service Account.
Login to VCD Provider portal as Administrator.
Edit the CSE Service Role.
Navigate to Administration > Provider Access Control > Roles > CSE Service Role.
In the tenant portal check if there’re any stale vApp entries for the failed clusters. If so, please delete them.
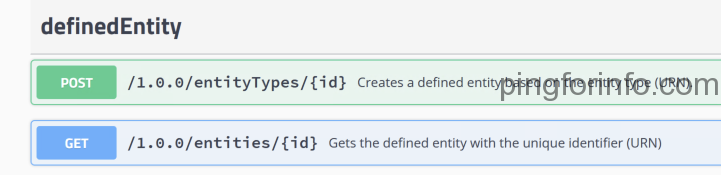
Login to VCD Provider portal with the CSE service account which has CSE Service Role assigned. Open API Explorer. Click on GET in difinedEntity section.
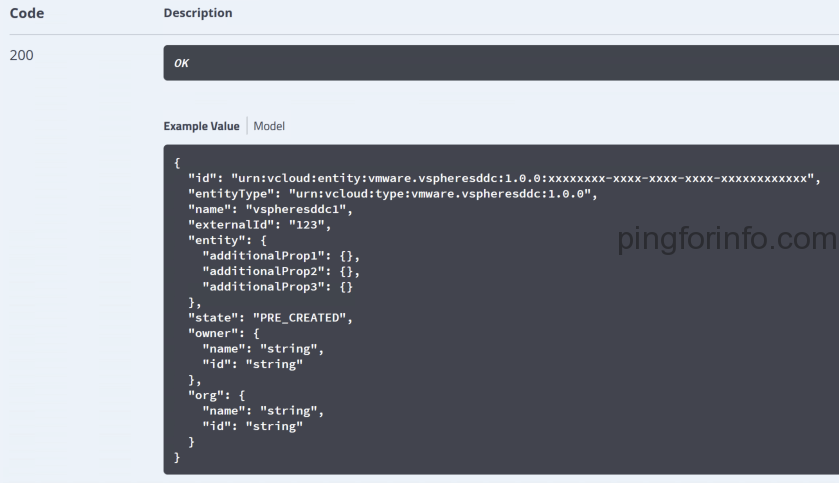
Click on TryitOut In Description, provide the cluster UID from last step. In the output we can see the state as PRE_CREATED.
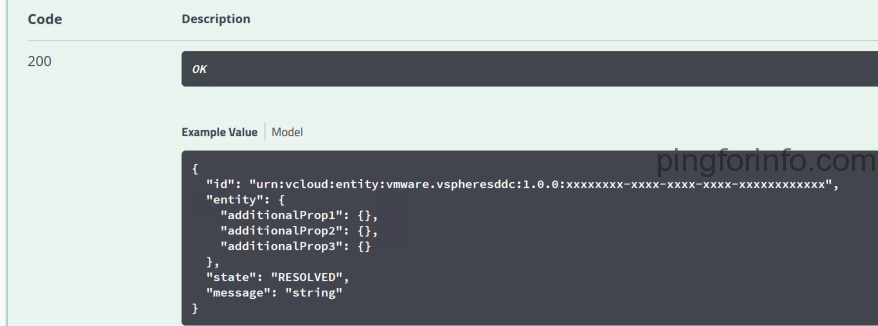
Step3: Run the POST call resolve to resolve
Select the POST call from definedEntity section.
/1.0.0/entities/{id}/resolve Validates the defined entity against the entity type schema.
Provide the cluster ID and run the call. The state will be changed to RESOLVED.
Step4: Run the DELETE call to delete RDE.
Povide the cluser ID and ‘false’ as value for inovkeHooks.
Please check and confirm the failed Cluster is deleted now.
#vcd cse cluster list
InsecureRequestWarning: Unverified HTTPS request is being made. Adding certificate verification is strongly advised.
Name      Org             Owner     VDC            K8s Runtime    K8s Version            Status
--------  --------------  --------  -------------  -------------  ---------------------  ------------------
tkg       CSE-Site1-Test  orgadmin  CSE-TEST-OVDC  TKGm           TKGm v1.21.2+vmware.1  DELETE:IN_PROGRESS
tkgtest   CSE-Site1-Test  orgadmin  CSE-TEST-OVDC  TKGm           TKGm v1.21.2+vmware.1  DELETE:IN_PROGRESS
tkg-test  CSE-Site1-Test  orgadmin  CSE-TEST-OVDC  TKGm           TKGm v1.21.2+vmware.1  DELETE:IN_PROGRESS
Please find the steps to deploy Container Service Extension 3.1.1.
Step 1: Deploy CentOS 7 VM
Selected CentOS 7 as the Operating System for CSE server. CentOS 7 has higher EOL than CentOS 8. You can find the installations steps for CentOS 7 here.
Please find more details on CentOS releases below.
Kindly ensure following configurations are done in CSE VM.
Configure DNS.
Configure NTP.
Configure SSH.
SSH access for root user is enabled.
Please note the following network connections are required for rest of the configurations.
Access to VCD URL (https) from CSE Server.
The Internet access from CSE server.
Step 2: Take a snapshot of CSE server VM.
It’s recommended to take a snapshot of CSE server before continuing with Python installation. It’s an optional step.
Step 3: Install Python 3.7.3 or greater
Install python 3.7.3 or greater in 3.7.x series. Please note that python 3.8.0 and above is not supported (ref: CSE doc) The built-in python version in CentOS 7 is 2.7. So, we’ve to install the latest in 3.7.x series, at the moment version 3.7.12 is the latest. Please follow the below steps to install Python.
yum update -y
yum install -y yum-utils
yum groupinstall -y development
yum install -y gcc openssl-devel bzip2-devel libffi-devel zlib-devel xz-devel

#Install sqlite3

cd /tmp/
curl -O https://www.sqlite.org/2020/sqlite-autoconf-3310100.tar.gz
tar xvf sqlite-autoconf-3310100.tar.gz
cd sqlite-autoconf-3310100/
./configure
make install

# Install Python

cd /tmp/
curl -O https://www.python.org/ftp/python/3.7.12/Python-3.7.12.tgz
tar -xvf Python-3.7.12.tgz
cd Python-3.7.12
./configure --enable-optimizations
make altinstall
alternatives --install /usr/bin/python3 python3 /usr/local/bin/python3.7 1
alternatives --install /usr/bin/pip3 pip3 /usr/local/bin/pip3.7 1
alternatives --list

# Check Python and pip3 versions

python3 --version
pip3 --version
Step 4: Install vcd-cli
# Install and verify vcd-cli
pip3 install vcd-cli
vcd version
     vcd-cli, VMware vCloud Director Command Line Interface, 24.0.1
Step 5: Install CSE
# Install and verify cse
pip3 install container-service-extension
cse version
CSE, Container Service Extension for VMware vCloud Director, version 3.1.1
Step 7: Create CSE Service Role for CSE server management
[root@test ~]# cse create-service-role <vcd fqdn> -s
Username for System Administrator: administrator
Password for administrator:
Connecting to vCD:  <vcd fqdn>
Connected to vCD as system administrator: administrator
Creating CSE Service Role...
Successfully created CSE Service Role
Step 7: Create service account for CSE in VCD
Create a Service Account in VCD with the role ‘CSE Service Role’
Step 8: Create service account for CSE in vCenter
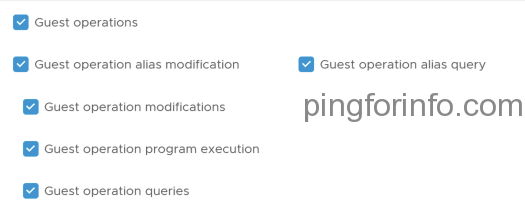
Create new role in vCenter with Power User + Guest Operations privilege. Assign the role to the service account for CSE.
Clone ‘Virtual Machine Power User (sample) role
Edit role
Select Virtual machine > Guest operations.
Step 9: Create a sample CSE config file and update it.
It will take a while to complete the download of template, be patient.
Downloading file from 'https://cloud-images.ubuntu.com/releases/xenial/release-20180418/ubuntu-16.04-server-cloudimg-amd64.ova' to 'cse_cache/ubuntu-16.04-server-cloudimg-amd64.ova'...
Download complete
Uploading 'ubuntu-16.04-server-cloudimg-amd64.ova' to catalog 'cse-site1-k8s'
Uploaded 'ubuntu-16.04-server-cloudimg-amd64.ova' to catalog 'cse-site1-k8s'
Deleting temporary vApp 'ubuntu-16.04_k8-1.21_weave-2.8.1_temp'
Creating vApp 'ubuntu-16.04_k8-1.21_weave-2.8.1_temp'
Found data file: /root/.cse_scripts/2.0.0/ubuntu-16.04_k8-1.21_weave-2.8.1_rev1/init.sh
Created vApp 'ubuntu-16.04_k8-1.21_weave-2.8.1_temp'
Customizing vApp 'ubuntu-16.04_k8-1.21_weave-2.8.1_temp', vm 'ubuntu-1604-k8s1212-weave281-vm'
Found data file: /root/.cse_scripts/2.0.0/ubuntu-16.04_k8-1.21_weave-2.8.1_rev1/cust.sh
Waiting for guest tools, status: "vm='vim.VirtualMachine:vm-2296', status=guestToolsNotRunning
Waiting for guest tools, status: "vm='vim.VirtualMachine:vm-2296', status=guestToolsNotRunning
Waiting for guest tools, status: "vm='vim.VirtualMachine:vm-2296', status=guestToolsNotRunning
Waiting for guest tools, status: "vm='vim.VirtualMachine:vm-2296', status=guestToolsRunning
.....
......
......

waiting for process 1611 on vm 'vim.VirtualMachine:vm-2296' to finish (1)
waiting for process 1611 on vm 'vim.VirtualMachine:vm-2296' to finish (2)
waiting for process 1611 on vm 'vim.VirtualMachine:vm-2296' to finish (3)
waiting for process 1611 on vm 'vim.VirtualMachine:vm-2296' to finish (4)
waiting for process 1611 on vm 'vim.VirtualMachine:vm-2296' to finish (5)
waiting for process 1611 on vm 'vim.VirtualMachine:vm-2296' to finish (6)
waiting for process 1611 on vm 'vim.VirtualMachine:vm-2296' to finish (7)
waiting for process 1611 on vm 'vim.VirtualMachine:vm-2296' to finish (8)
...
...
..
/etc/kernel/postinst.d/x-grub-legacy-ec2:
Searching for GRUB installation directory ... found: /boot/grub
Searching for default file ... found: /boot/grub/default
Testing for an existing GRUB menu.lst file ... found: /boot/grub/menu.lst
Searching for splash image ... none found, skipping ...
Found kernel: /boot/vmlinuz-4.4.0-119-generic
Found kernel: /boot/vmlinuz-4.4.0-210-generic
Found kernel: /boot/vmlinuz-4.4.0-119-generic
Updating /boot/grub/menu.lst ... done

/etc/kernel/postinst.d/zz-update-grub:
Generating grub configuration file ...
Found linux image: /boot/vmlinuz-4.4.0-210-generic
Found initrd image: /boot/initrd.img-4.4.0-210-generic
Found linux image: /boot/vmlinuz-4.4.0-119-generic
Found initrd image: /boot/initrd.img-4.4.0-119-generic
done
customization completed

Customized vApp 'ubuntu-16.04_k8-1.21_weave-2.8.1_temp', vm 'ubuntu-1604-k8s1212-weave281-vm'
Creating K8 template 'ubuntu-16.04_k8-1.21_weave-2.8.1_rev1' from vApp 'ubuntu-16.04_k8-1.21_weave-2.8.1_temp'
Shutting down vApp 'ubuntu-16.04_k8-1.21_weave-2.8.1_temp'
Successfully shut down vApp 'ubuntu-16.04_k8-1.21_weave-2.8.1_temp'
Capturing template 'ubuntu-16.04_k8-1.21_weave-2.8.1_rev1' from vApp 'ubuntu-16.04_k8-1.21_weave-2.8.1_temp'
Created K8 template 'ubuntu-16.04_k8-1.21_weave-2.8.1_rev1' from vApp 'ubuntu-16.04_k8-1.21_weave-2.8.1_temp'
Successfully tagged template ubuntu-16.04_k8-1.21_weave-2.8.1_rev1 with placement policy native.
Deleting temporary vApp 'ubuntu-16.04_k8-1.21_weave-2.8.1_temp'
Deleted temporary vApp 'ubuntu-16.04_k8-1.21_weave-2.8.1_temp'
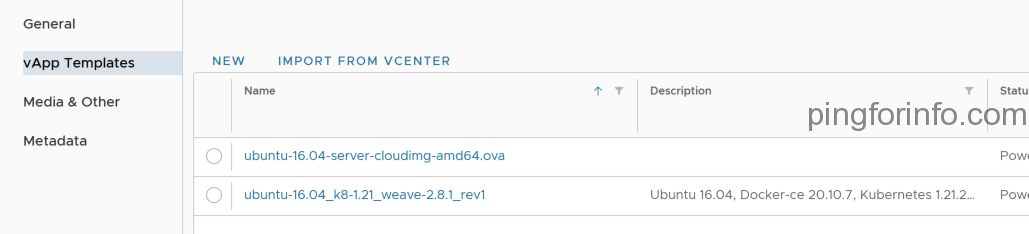
Step 12: Confirm the template is available in CSE catalog
Login to CSE Tenant portal. Navigate to the Libraries > Catalogs > vApp Templates. We can see the newly created K8S upstream template.
Step 13: Enable Organizations for Native deployments.
The provider must explicitly enable organizational virtual datacenter(s) to host native deployments, by running the command: vcd cse ovdc enable.
vcd login <vcd> system administrator -i
InsecureRequestWarning: Unverified HTTPS request is being made. Adding certificate verification is strongly advised.
Password:
administrator logged in, org: 'system', vdc: ''

# vcd cse ovdc enable <orgvdc> -n -o <organization>
# vcd cse ovdc enable TEST-OVDC -n -o Site1-Test

InsecureRequestWarning: Unverified HTTPS request is being made. Adding certificate verification is strongly advised.
OVDC Update: Updating OVDC placement policies
task: 10e70b37-5aa6-4cf9-b437-ef478bd9f06a, Operation success, result: success
Step 14: Check Create New Native Cluster is available now
Login to the VCD Tenant portal and navigate to More > Kubernetes Container Clusters. Click on New.
We can see the option to ‘Create New Native Cluster’.
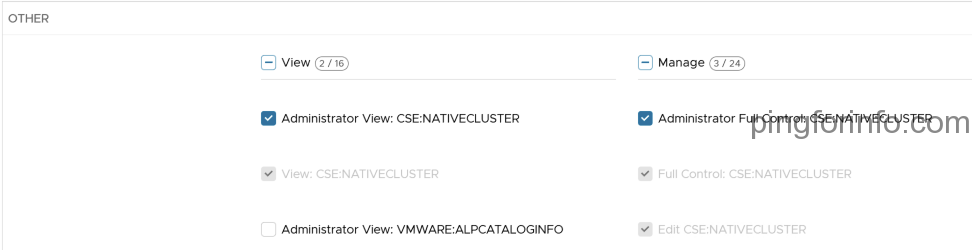
Step 15: Publish Right Bundle ‘cse:nativeCluster Entitlement’
The following article has details on differences between right bundle and roles.
Sometimes it’s annoying when Photon OS based appliances doesn’t allow to use previously used password for root user. You may see the error ‘Password has been already used. Choose another‘ when you try to use the password which was used earlier.
root@test [ ~ ]# passwd
New password:
Retype new password:
Password has been already used. Choose another.
By default, Photon OS remember last Five passwords. You can see the setting ‘remember=3’ in /etc/pam.d/system-password
Please find the steps to upgrade VMware Cloud Director App Launchpad from version 2.0 to 2.1
Download VMware Cloud Director App Launchpad 2.1 RPM package from here.
Upload it to the App Launchpad VM.
Open an SSH connection to the App Launchpad VM and log in as root.
Upgrade the RPM package.
[root@test ~]# rpm -U vmware-alp-2.1.0-18834930.x86_64.rpm
warning: vmware-alp-2.1.0-18834930.x86_64.rpm: Header V3 RSA/SHA1 Signature, key ID 001e5cc9: NOKEY
Upgrading...

Execute 'alp upgrade' to upgrade ...

  Append the excute permission to the existing logs...
5. Run the following command to upgrade App Launchpad.
[root@test ~]# alp upgrade --admin-user administrator@system --admin-pass 'passwd'
Upgraded the plugin of App Launchpad successfully.

Upgraded the management service successfully.
  [Upgrade Task]
     CREATE_ENTITY_TYPE_CATALOG_INFO : true
     MIGRATE_CATALOGS : true
     CREATE_ENTITY_TYPE_SIZING_TEMPLATE : true
     MIGRATE_LEGACY_SIZING_TEMPLATES : true
     CREATE_ENTITY_TYPE_MARKETPLACE_BANNER : true
     CREATE_ENTITY_TYPE_ORG_METRICS : true
     UPGRADE_SERVICE_ROLE : true
6. Restart alp service and confirm its running.
[root@test~]# systemctl restart alp
[root@test ~]# systemctl status alp
● alp.service - VMware ALP Management Service
   Loaded: loaded (/usr/lib/systemd/system/alp.service; enabled; vendor preset: disabled)
   Active: active (running) since Thu 2021-11-18 11:46:14 +01; 14s ago
 Main PID: 29334 (java)
   CGroup: /system.slice/alp.service
           └─29334 java -jar /opt/vmware/alp/alp.jar --logging.path=log

Nov 18 11:46:14 bd1-srp-al01.acs.local systemd[1]: Stopped VMware ALP Management Service.
Nov 18 11:46:14 bd1-srp-al01.acs.local systemd[1]: Started VMware ALP Management Service.
7. Diagnose deployment errors by running the /opt/vmware/alp/bin/diagnose executable file.
The diagnose tool verifies that the services are up and running and that all configuration requirements are met.
[root@test ~]# /opt/vmware/alp/bin/diagnose

Step 1: System diagnose
--------------------------------------------------------------------------------
- App Launchpad service is initialized.


Step 2: Cloud Director diagnose
--------------------------------------------------------------------------------
- Service Account for App Launchpad is good.
- App Launchpad's extension is ready.


Step 3: MQTT diagnose
--------------------------------------------------------------------------------
- Cloud Director MQTT for extensibility is ready.


Step 4: Integration diagnose
--------------------------------------------------------------------------------
- App Launchpad API is up, and version is 2.1.0-18834930.


Step 5: App Launchpad diagnose
--------------------------------------------------------------------------------
- App Launchpad service is listening on port 8086.
8. Confirm the ALP version.
[root@test ~]# alp
NAME:
        alp - The Cloud Director App Launchpad
        (ALP) Command-line tool

USAGE:
        alp <subcommand> [flags]

VERSION:
        '2.1.0-18834930'
Lambda is an AWS offering to build serverless applications. It helps you to run code without provisioning or managing servers. The Lambda functions can be invoked directly through API calls or in response to events. AWS will charge the customer only for the compute time consumed by Lambda function, so no need to pay for idle time. You can learn more about lambda here.
AWS Lambda, PowerShell and PowerCLI
The code you run on AWS Lambda is uploaded as a ‘Lambda Function’. AWS Lambda natively supports PowerShell as scripting language. It helps us to write Lambda functions in PowerShell which includes commands from PowerCLI modules.
Let us see the steps to create a PowerShell based Lambda Function to get the list of VMs from a VMware Cloud on AWS SDDC. As of now the AWS Code Editor doesn’t support writing or editing PowerShell based Lambda functions. The steps discuss how to create the Lambda functions offline and deploy them in AWS Lambda.
The Lambda functions in PowerShell require PowerShell Core 6.0, Windows PowerShell isn’t supported. If you have PowerShell Core 6.0 or above already installed, skip to step 2. The environment variable $PSVersionTable will help you to find the PowerShell version and Edition.
I’ve used Powershell Core v6.2.1 which can be downloaded from PowerShell GitHub repo.
1.2 Once downloaded, double-click the installer and follow the prompts.
Step 2 : Install .NET Core 2.1 SDK.
Because PowerShell Core is built on top of .NET Core, the Lambda support for PowerShell uses the same .NET Core 2.1 runtime for both .NET Core and PowerShell Lambda functions. The .NET Core 2.1 SDK is used by the Lambda PowerShell publishing cmdlets to create the Lambda deployment package. The .NET Core 2.1 SDK is available at .NET downloads on the Microsoft website. Be sure to install the SDK and not the runtime installation.
Open PowerShell Core and run the following command to install ‘AWSLambdaPSCore’ module.
Install-Module AWSLambdaPSCore -Scope CurrentUser
The following are the commands available in module ‘AWSLambdaPSCore’
Step 4 : Install PowerCLI
If you already have PowerCLI modules installed in Powershell Core, skip this step.
Open PowerShell Core and run the following command
Install-Module VMware.PowerCLI
Step 5 : Create script from PowerShell Lambda Templates.
AWSLambdaPSCore module provides some Script Templates. Get-AWSPowerShellLambdaTemplate will list out the available templates.
We will use the template ‘Basic’ to create script ‘VMC-GetVM.ps1’ for getting the VM list from VMC SDDC.
Step 6 : Modify the script to get the VMs from vCenter located VMConAWS SDDC.
If you are new to Powershell Lambda its good to go through this articleto understand Input Object, Returning Data, Additional Modules and Logging.
Open the script VMC-GetVM.ps1 in the editor, I use VSCode. Replace the content of the script with the following script.
Note: Please ensure the version of modules marked with #Requiresstatement are same as the version of modules loaded in Powershell Core. If it’s different, then update the script with version details of corresponding modules which are loaded. The following command will help to find the versions of required modules.
The values for the properties (venter, vCenterUser, etc) in the object $LamdaInput will be passed when we execute the function.
# PowerShell script file to be executed as a AWS Lambda function.
#
# When executing in Lambda the following variables will be predefined.
#   $LambdaInput - A PSObject that contains the Lambda function input data.
#   $LambdaContext - An Amazon.Lambda.Core.ILambdaContext object that contains information about the currently running Lambda environment.
#
# The last item in the PowerShell pipeline will be returned as the result of the Lambda function.
#
# To include PowerShell modules with your Lambda function, like the AWSPowerShell.NetCore module, add a "#Requires" statement
# indicating the module and version.
#Requires -Modules @{ModuleName='VMware.VimAutomation.Sdk';ModuleVersion='11.3.0.13964823'}
#Requires -Modules @{ModuleName='VMware.VimAutomation.Common';ModuleVersion='11.3.0.13964816'}
#Requires -Modules @{ModuleName='VMware.Vim';ModuleVersion='6.7.0.13964812'}
#Requires -Modules @{ModuleName='VMware.VimAutomation.Cis.Core';ModuleVersion='11.3.0.13964830'}
#Requires -Modules @{ModuleName='VMware.VimAutomation.Core';ModuleVersion='11.3.0.13964826'}

# Uncomment to send the input event to CloudWatch Logs
#Write-Host (ConvertTo-Json -InputObject $LambdaInput -Compress -Depth 5)

$vCenter = $lambdainput.vCenter
$vCenterUser = $lambdainput.vCenterUser
$vCenterPassword = $lambdainput.vCenterpassword
Connect-VIServer $vCenter -User $vCenterUser -Password $vCenterPassword
$vmlist = get-vm
Write-Host $vmlist.Name
Save the script.
Step 7 : Reduce the size of package
In next step we will publish the Lambda Function. While publishing, a deployment package that contains our PowerShell script ‘VMC-GetVM.ps1’ and all modules declared with the #Requires statement will be created. But the deployment may fail since the package with listed PowerCLI modules will exceed Lambda’s hard limit on Package size, ie 69905067bytes. In that situation the following error will be thrown.
To avoid that, as a workaround, we’ve to reduce the package size by cutting down the size of PowerCLI modules. When I checked ‘VMware.VimAutomation.Core’ is the largest module which is due to Remote Console files included in the module.
Browse to the following path and move the folder ‘VMware Remote Console’ to Documents.
I was in search for a script to generate report on vCPU to pCPU ratio and vRAM to pRAM at cluster level in a vCenter. Found couple of interesting community threads which address part of the requirements. Thought to consolidate (or extract:) ) the code and created the following. The report will be generated as CSV file.
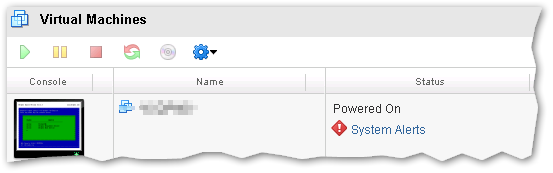
VMs in vCloud Director displays the message : “System alert – This VM has a compliance failure against its Storage Policy.”
Symptoms :
After changing the storage profile of the VM you may observe the following error in ‘Status‘.
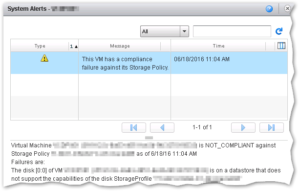
“System alerts – This VM has a compliance failure against its Storage Policy.”
Virtual Machine <VMName>(UUID) is NOT_COMPLIANT against Storage Policy <SP Name> as of 6/18/16 11:04 AM Failures are: The disk [0:0] of VM <VMName>(UUID) is on a datastore that does not support the capabilities of the disk StorageProfile <SP Name>
Resolution :
To reset the alarm in the vCloud Director.
Option 1:
Click the System Alert and select ClearAll.
Option 2:
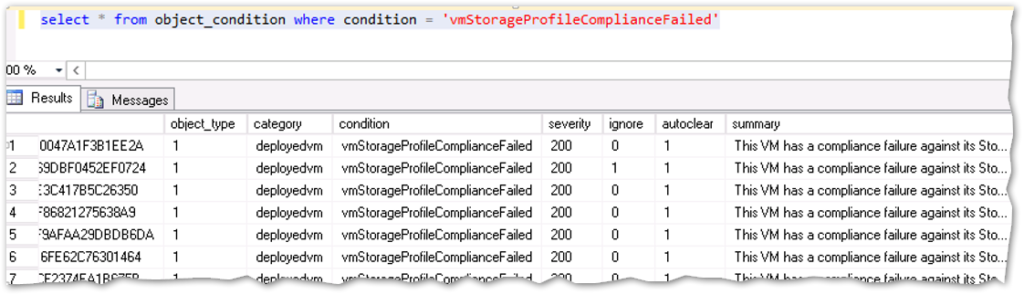
If many VMs have the same alerts then its difficult to clear one by one. In that case we can use SQL statement to clear all alerts.
Log in to the database with Admin credentials using Microsoft SQL Management Studio.
Run this SQL statement to display all virtual machines with the system alert:
#
select * from object_condition where condition = 'vmStorageProfileComplianceFailed'
#
Run this update statement to clear the alert in the vCD UI:
#
update object_condition set ignore = 1 where condition = 'vmStorageProfileComplianceFailed'
#