Managing large-scale VMware Cloud Foundation (VCF) environments can be challenging, especially when it comes to adding multiple hosts. The bulk commission feature, which uses a JSON template, simplifies this process significantly, making it more efficient and error-free. In this blog, we’ll walk through how to commission hosts in VCF using the bulk commission method with JSON, along with screenshots for each step.
Why Use Bulk Commission?
Efficiency: Quickly add multiple hosts without repetitive manual steps.
Consistency: Ensure all hosts are configured according to predefined standards.
Scalability: Ideal for large environments, reducing administrative overhead.
Step-by-Step Guide to Bulk Commission Hosts Using JSON
Step 1: Prepare the JSON Template
First, create a JSON file that includes the details of the hosts you want to commission. Here’s an example template:
Ensure that each host meets the necessary criteria for VCF, such as compliance with the VMware Hardware Compatibility Guide.
Step 2: Upload the JSON Template to SDDC Manager
Log in to the SDDC Manager.
Navigate to the ‘Hosts’ section.
Click on ‘Commission Hosts’.
‘Select All’ in the checklist and click on Proceed
Click on ‘Import’ andUpload the JSON file containing your host details.
Step 3: Validate and Commission the Hosts
SDDC Manager will validate the JSON template and the hosts listed.
Review the validation results. If any issues are found, correct them in the JSON file and re-upload.
Confirm the commissioning to proceed with adding the hosts to the SDDC Manager.
Step 4: Monitor the Commissioning Process
Monitor the progress in the SDDC Manager dashboard.
Check for any errors or warnings during the process and resolve them as needed.
Conclusion
Using the bulk commission feature in VMware Cloud Foundation with a JSON template streamlines the process of adding multiple hosts, making it faster and more reliable. This method not only enhances efficiency but also ensures consistency across your infrastructure. By following these steps, you can easily scale up your VCF environment with minimal effort.
This blog post guides you through uninstalling NVIDIA Enterprise AI drivers from an ESXi 8.0U2 host.
Putting the ESXi Host into Maintenance Mode
Before modifying software configurations, it’s crucial to put the ESXi host into maintenance mode. This ensures no running virtual machines are affected during the process.
Checking Installed NVIDIA Drivers
Once in maintenance mode, SSH to the host and use the following command to identify currently installed NVIDIA drivers:
The output will display details like driver name, version, and installation date. In the example, the following NVIDIA VIBs are found:
NVD-AIE_ESXi_8.0.0_Driver
nvdgpumgmtdaemon
Removing the Driver VIBs
Now, proceed to remove the listed VIBs using the esxcli software vib remove command. Here’s how to remove each VIB:
nvdgpumgmtdaemon:
[root@esx1-sree-lab:~] esxcli software vib remove -n nvdgpumgmtdaemon
Removal Result
Message: The update completed successfully, but the system needs to be rebooted for the changes to be effective.
VIBs Installed:
VIBs Removed: NVD_bootbank_nvdgpumgmtdaemon_535.154.02-1OEM.700.1.0.15843807
VIBs Skipped:
Reboot Required: true
DPU Results:
This command removes the nvdgpumgmtdaemon VIB. The output will confirm successful removal and indicate a required reboot for changes to take effect.
NVD-AIE_ESXi_8.0.0_Driver:
[root@esx1-sree-lab:~] esxcli software vib remove -n NVD-AIE_ESXi_8.0.0_Driver
Removal Result
Message: The update completed successfully, but the system needs to be rebooted for the changes to be effective.
VIBs Installed:
VIBs Removed: NVD_bootbank_NVD-AIE_ESXi_8.0.0_Driver_535.154.02-1OEM.800.1.0.20613240
VIBs Skipped:
Reboot Required: true
DPU Results:
Similarly, this command removes the main NVIDIA driver VIB and prompts for a reboot.
Rebooting the ESXi Host
After removing both VIBs, it’s essential to reboot the ESXi host to apply the changes. Use the following command:
[root@esx1-sree-lab:~] reboot
The host will reboot, and the NVIDIA drivers will be uninstalled.
Verifying Uninstallation
Once the ESXi host restarts, confirm that the NVIDIA drivers are no longer present. Use the same command as before to check the installed VIBs:
[root@esx1-sree-lab:~] esxcli software vib list | grep -i NVD
If the output is empty or doesn’t contain any NVIDIA-related entries, the drivers have been successfully uninstalled.
Important Notes:
This guide serves as a general overview. Always refer to the official documentation for your specific NVIDIA driver version and ESXi host configuration for detailed instructions.
Putting the ESXi host into maintenance mode is crucial to avoid disruptions to running virtual machines.
By following these steps, you can effectively uninstall NVIDIA Enterprise AI drivers from your ESXi 8.0U2 host
This blog post guides you through replacing the certificate for your Harbor registry deployed on a Tanzu Kubernetes Grid (TKG) cluster using Helm charts. We’ll assume you’re using VCD version 10.5.1 and Container Service Extension (CSE) version 4.2.
Understanding the Need for Certificate Replacement
Harbor certificates, like any security certificate, may need to be replaced due to expiration, security upgrades, or changes in your PKI infrastructure. This process ensures secure communication within your container registry.
Prerequisites
Access to your TKG cluster and kubectl CLI.
New certificate and key files (harbor-v2.crt and harbor-v2.key).
Steps:
Create a New Secret:
We’ll store the new certificate and key in a Kubernetes secret for secure management. Use the kubectl create secret tls command to create a secret named harbor-secret-v2:
This command upgrades the harbor deployment in the harbor-system namespace using the configuration specified in the updated values.yaml file.
Conclusion
By following these steps, you’ve successfully replaced the certificate for your Harbor registry deployed on your TKG cluster. Remember to update your Harbor clients or local configurations to reflect the new certificate details for continued secure communication.
In the realm of modern data centers, leveraging GPU acceleration has become a crucial aspect of enhancing computational capabilities, especially in AI and machine learning workloads. VMware ESXi, a leading hypervisor, coupled with NVIDIA’s AI Enterprise software stack, empowers enterprises to efficiently deploy and manage GPU-accelerated virtualized environments. In this guide, we’ll walk you through the process of installing the NVIDIA Enterprise AI driver on VMware ESXi, enabling support for the NVIDIA H100 SXM 80GB HBM3 GPU.
Firstly, obtain the NVIDIA AI Enterprise 5.0 driver bundle from the NVIDIA License portal. Ensure compatibility with your ESXi version and GPU model. In this case, we are using NVIDIA-AI-Enterprise-vSphere-8.0-550.54.16-550.54.15-551.78.zip.
Step 2: Upload the Driver Bundle
Unzip the downloaded driver bundle and upload it to a shared datastore within your vSphere cluster. Utilize the vSphere client’s File browser option for seamless uploading.
Step 3: Prepare the Host
Put the ESXi host into maintenance mode to ensure uninterrupted installation.
SSH into the ESXi host for command-line access.
Step 4: Install the NVIDIA Enterprise AI Driver
Execute the following command to install the NVIDIA Enterprise AI driver on the ESXi host:
Replace and path/to/driver_bundle.zip with the appropriate datastore name and path. After installation, you should receive a confirmation message indicating successful installation.
Reboot the ESXi host to finalize the driver installation process.
Step 6: Verify Installation
Upon reboot, ensure that the NVIDIA vGPU software package is correctly installed and loaded. Check for the NVIDIA kernel driver by running the following command:
Virtual Graphics Processing Units (vGPUs) are a game-changer for cloud deployments, enabling high-performance graphics processing for workloads like 3D design, video editing, and AI applications within virtual machines (VMs). VMware Cloud Director (VCD) streamlines vGPU management through vGPU policies, allowing you to define the allocation of these powerful resources to your VMs.
This blog post will guide you through creating a vGPU policy in VCD, ensuring your VMs have the graphics horsepower they need:
Prerequisites:
Access to the VCD Provider Portal with administrative privileges.
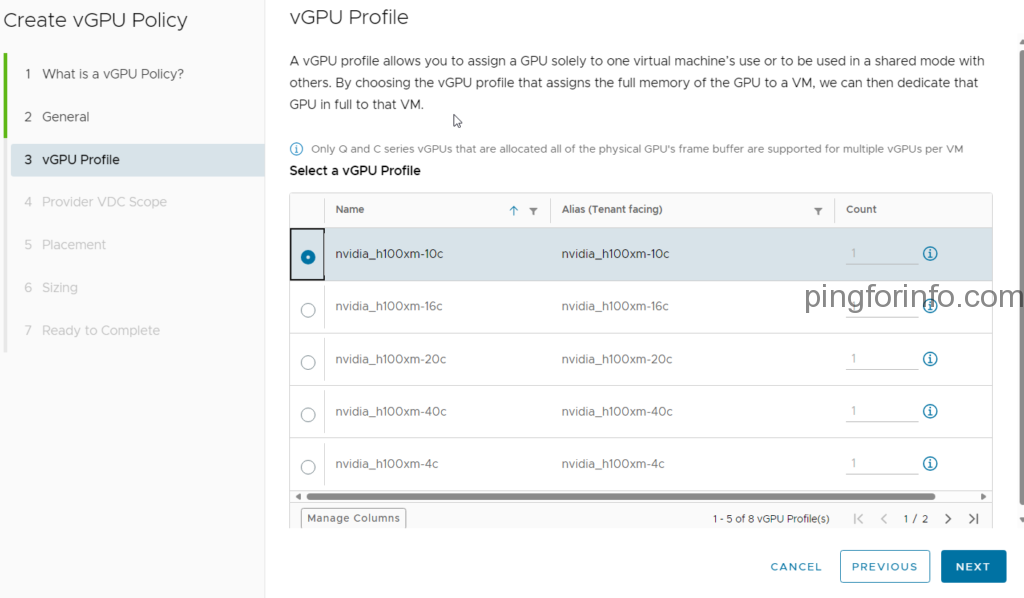
Pre-configured vGPU profiles in VCD. These profiles represent the different types of vGPUs available in your environment, typically created from the capabilities of your underlying vSphere cluster with NVIDIA GPUs.
Creating a vGPU Policy:
Log in to the VCD Provider Portal with your administrative credentials.
Verify vGPU Profile Visibility: Navigate to Infrastructure Resources > vGPU Profiles. Ensure the vGPU profiles corresponding to your available GPUs are listed here. If not, you’ll need to create them beforehand (refer to your VCD documentation for specific steps).
Create the vGPU Policy:
Go to Cloud Resources > vGPU Policies.
Click New.
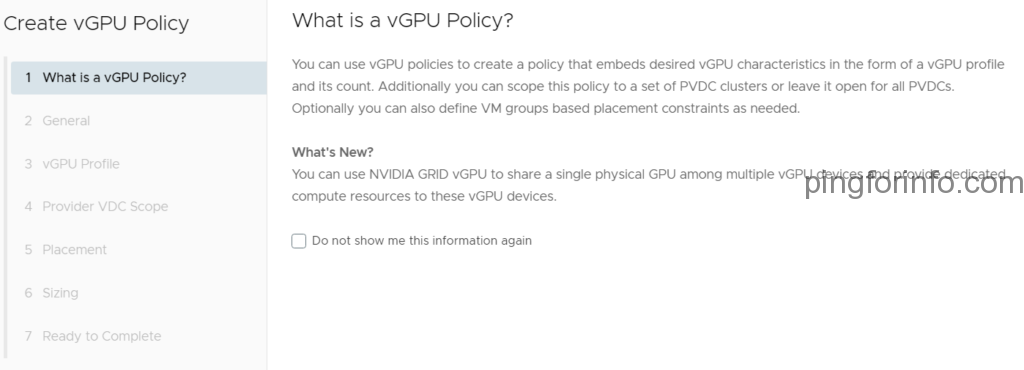
On the “What is a vGPU Policy?” screen, click Next.
Define Policy Details:
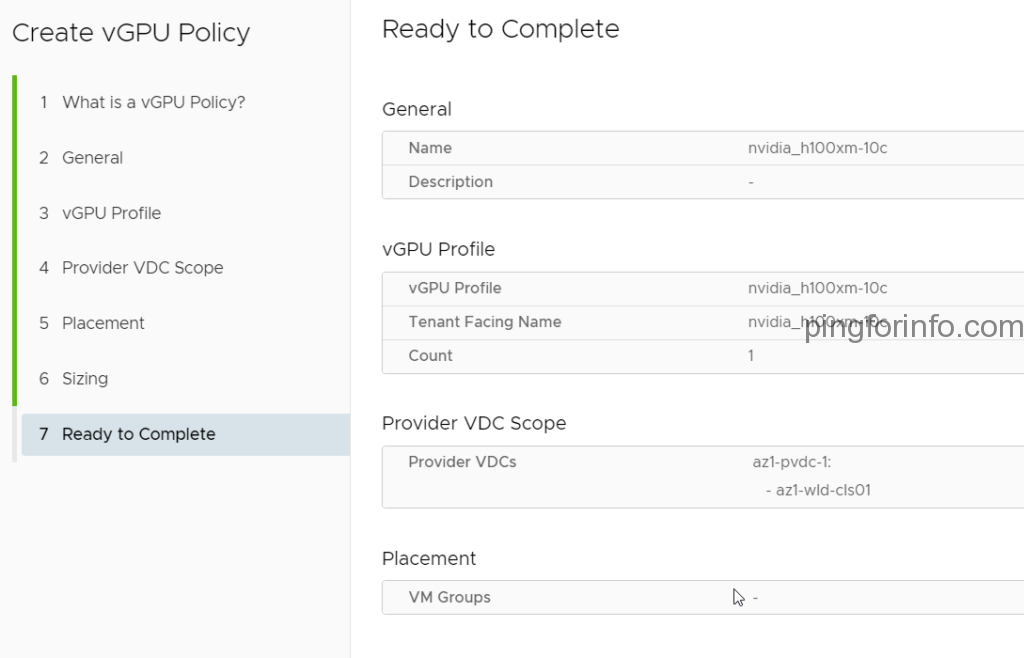
Name: Enter a descriptive name for your vGPU policy. Ideally, match it to the vGPU profile it references for clarity (e.g., “High Performance vGPU”).
vGPU Profile: Select the vGPU profile that defines the type and capabilities of the vGPU to be assigned.
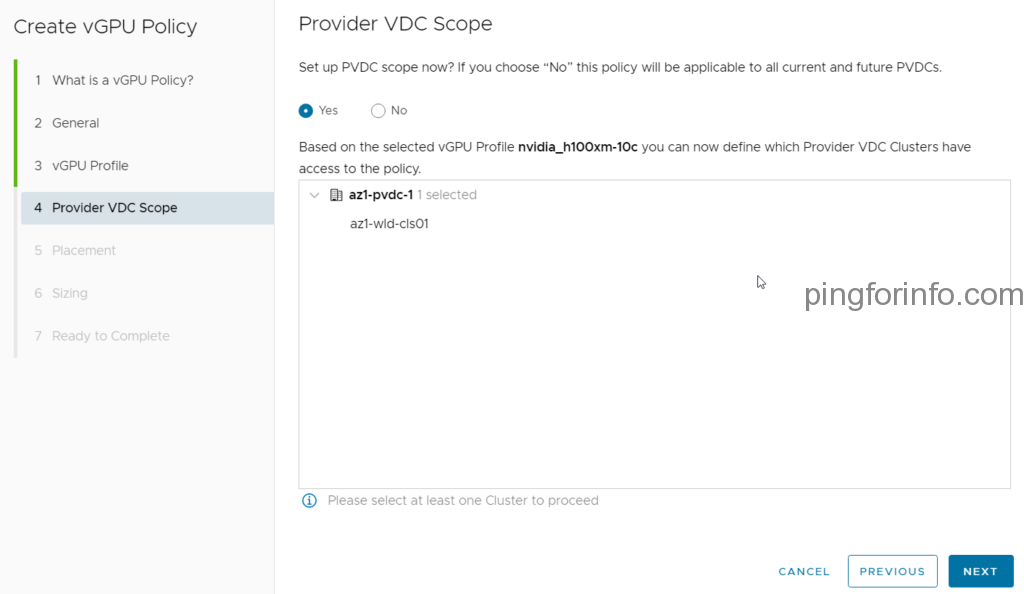
Provider VDC Scope : Choose the PVDC has access to the poloicy.
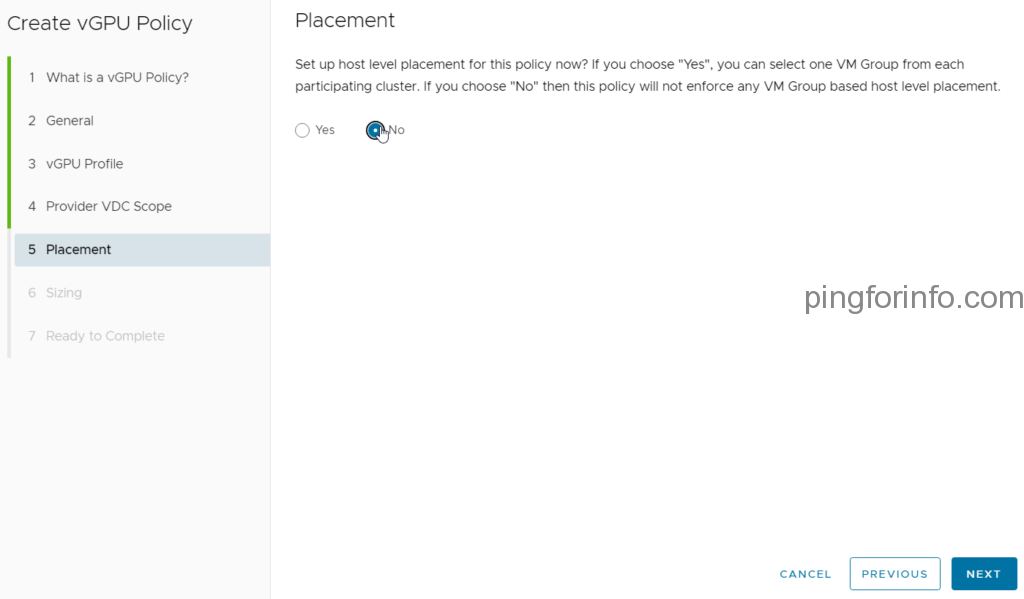
Placement: Choose No for placement flexibility. You can assign this policy to VMs and let VCD determine optimal placement based on available resources.
Sizing: Select No for sizing flexibility. You can configure VM CPU, memory, and storage independently during VM deployment.
Finalize the Policy:
Select the Organization VDC where you want this policy to be available.
Review the policy details on the “Ready to Complete” screen and click Finish to create the vGPU policy.
Congratulations! You’ve successfully created a vGPU policy in VCD. Now, when deploying VMs in the chosen Organization VDC, you can assign this policy to provide the necessary vGPU power for your graphics-intensive workloads.
Additional Considerations:
You can create multiple vGPU policies with different vGPU profiles to cater to varying VM requirements.
For more granular control, explore the options for placement and sizing policies within VCD, allowing you to define specific placement rules and resource allocation for vGPU-enabled VMs.
By leveraging vGPU policies, you can efficiently manage and allocate vGPU resources within your VCD environment, empowering your tenants with the graphics processing capabilities they need for their demanding workloads.
In the sphere of cloud management, ensuring uninterrupted service is of paramount importance. However, challenges can emerge, affecting the smooth operation of services. Recently, a noteworthy issue surfaced with a customer – the ‘VMware Cloud Director service crashing when Container Service Extension communicates with VCD.’ This article delves into the symptoms, causes, and, most crucially, the solution to address this challenge.
It’s important to note that the workaround provided here is not an official recommendation from VMware. It should be applied at your discretion. We anticipate that VMware will release an official KB addressing this issue in the near future. The product versions under discussion in this article are VCD 10.4.2 and CSE 4.1.0.
Symptoms:
The VCD service crashes on VCD cells when traffic from CSE servers is permitted.
The count of ‘BEHAVIOR_INVOCATION’ operation in VCD DB is quite high (more than 10000).
vcloud=# select count(*) from jobs where operation = 'BEHAVIOR_INVOCATION';
count
--------
385151
(1 row)
In the logs, you may find the following events added in cell.log:
Successfully verified transfer spooling area: VfsFile[fileObject=file:///opt/vmware/vcloud-director/data/transfer]
Cell startup completed in 1m 39s
java.lang.OutOfMemoryError: Java heap space
Dumping heap to /opt/vmware/vcloud-director/logs/java_pid14129.hprof ...
Dump file is incomplete: No space left on device
log4j:ERROR Failed to flush writer,
java.io.IOException: No space left on device
at java.base/java.io.FileOutputStream.writeBytes(Native Method)
Cause:
The root cause of this issue lies in VCD generating memory heap dumps due to an ‘OutOfMemoryError’ due to this, in turn, leads to the storage space being exhausted and ultimately results in the VCD service crashing.
Resolution:
The good news is that the VMware has identified this as a bug within VCD and plans to address it in the upcoming update releases of VCD. While we eagerly await this update, the team has suggested a workaround in case you encounter this issue:
SSH into each VCD cell.
Check the “/opt/vmware/vcloud-director/logs” directory for java heap dump files (.hprof) on each cell.
While attempting to connect to VMware Cloud Director 10.4 using PowerCLI, I encountered the error message “The server returned the following: NotAcceptable: ”.”
PS C:\Users\sreejesh> Connect-CIServer -Server vcd.sreejesh.lab -Credential (Get-Credential)
Connect-CIServer : 3/27/2023 8:01:29 AM Connect-CIServer Unable to connect to vCloud Server 'https://vcd.sreejesh.lab:443/api/'. The server returned the following: NotAcceptable: ''.
At line:1 char:1
+ Connect-CIServer -Server https://vcd.sreejesh.lab ...
+ ~~~~~~~~~~~~~~~~~~~~~~~~~~~~~~~~~~~~~~~~~~~~~~~~~~~~~~~~~~~~~~~~~~~~~
+ CategoryInfo : NotSpecified: (:) [Connect-CIServer], CIException
+ FullyQualifiedErrorId : Cloud_ConnectivityServiceImpl_ConnectCloudServer_ConnectError,VMware.VimAutomation.Cloud.Commands.Cmdlets.ConnectCIServer
This issue is a known limitation with PowerCLI versions prior to 13.0. The error occurs because PowerCLI versions earlier than 13.0.0 do not support VMware Cloud Director API versions greater than 33.0. To resolve this issue, the solution is to install the latest version of PowerCLI, version 13.0. If encountering this issue, first confirm that the current PowerCLI version is less than 13.0, and if so, uninstall and reinstall with the latest version to resolve the issue.