VMware Cloud Director Service Crashes During CSE Communication with VCD

Introduction

In the sphere of cloud management, ensuring uninterrupted service is of paramount importance. However, challenges can emerge, affecting the smooth operation of services. Recently, a noteworthy issue surfaced with a customer – the ‘VMware Cloud Director service crashing when Container Service Extension communicates with VCD.’ This article delves into the symptoms, causes, and, most crucially, the solution to address this challenge.

It’s important to note that the workaround provided here is not an official recommendation from VMware. It should be applied at your discretion. We anticipate that VMware will release an official KB addressing this issue in the near future. The product versions under discussion in this article are VCD 10.4.2 and CSE 4.1.0.

Symptoms:

  • The VCD service crashes on VCD cells when traffic from CSE servers is permitted.
  • The count of ‘BEHAVIOR_INVOCATION’ operation in VCD DB is quite high (more than 10000).
vcloud=# select count(*) from jobs where operation = 'BEHAVIOR_INVOCATION';
 count
--------
 385151
(1 row)
  • In the logs, you may find the following events added in cell.log:
Successfully verified transfer spooling area: VfsFile[fileObject=file:///opt/vmware/vcloud-director/data/transfer] 
Cell startup completed in 1m 39s
java.lang.OutOfMemoryError: Java heap space
Dumping heap to /opt/vmware/vcloud-director/logs/java_pid14129.hprof ...
Dump file is incomplete: No space left on device
log4j:ERROR Failed to flush writer,
java.io.IOException: No space left on device
at java.base/java.io.FileOutputStream.writeBytes(Native Method)

Cause:

The root cause of this issue lies in VCD generating memory heap dumps due to an ‘OutOfMemoryError’ due to this, in turn, leads to the storage space being exhausted and ultimately results in the VCD service crashing.

Resolution:

The good news is that the VMware has identified this as a bug within VCD and plans to address it in the upcoming update releases of VCD. While we eagerly await this update, the team has suggested a workaround in case you encounter this issue:

  1. SSH into each VCD cell.
  2. Check the “/opt/vmware/vcloud-director/logs” directory for java heap dump files (.hprof) on each cell.

cd /opt/vmware/vcloud-director/logs

  1. Remove the files with the “.hprof” extension.
[ /opt/vmware/vcloud-director/logs ]# rm java_xxxxx.hprof
  1. Connect to the VCD database:
   sudo -i -u postgres psql vcloud
  1. Delete records of the operations ‘BEHAVIOR_INVOCATION’ from the ‘jobs’ table:
   vcloud=# delete from jobs where operation = 'BEHAVIOR_INVOCATION';
  1. Perform a service restart on all the VCD cells serially:
   service vmware-vcd restart

By following these steps, you can mitigate the issue and keep your VCD service running smoothly until the official bug fix is released in VCD.

Unable to connect VMware Cloud director 10.4 through PowerCLI

While attempting to connect to VMware Cloud Director 10.4 using PowerCLI, I encountered the error message “The server returned the following: NotAcceptable: ”.”

 PS C:\Users\sreejesh> Connect-CIServer -Server vcd.sreejesh.lab -Credential (Get-Credential)
Connect-CIServer : 3/27/2023 8:01:29 AM	Connect-CIServer		Unable to connect to vCloud Server 'https://vcd.sreejesh.lab:443/api/'. The server returned the following: NotAcceptable: ''.	
At line:1 char:1
+ Connect-CIServer -Server https://vcd.sreejesh.lab  ...
+ ~~~~~~~~~~~~~~~~~~~~~~~~~~~~~~~~~~~~~~~~~~~~~~~~~~~~~~~~~~~~~~~~~~~~~
    + CategoryInfo          : NotSpecified: (:) [Connect-CIServer], CIException
    + FullyQualifiedErrorId : Cloud_ConnectivityServiceImpl_ConnectCloudServer_ConnectError,VMware.VimAutomation.Cloud.Commands.Cmdlets.ConnectCIServer 

This issue is a known limitation with PowerCLI versions prior to 13.0. The error occurs because PowerCLI versions earlier than 13.0.0 do not support VMware Cloud Director API versions greater than 33.0. To resolve this issue, the solution is to install the latest version of PowerCLI, version 13.0. If encountering this issue, first confirm that the current PowerCLI version is less than 13.0, and if so, uninstall and reinstall with the latest version to resolve the issue.

 
PS C:\Users\sreejesh> Get-PowerCLIVersion
WARNING: The cmdlet "Get-PowerCLIVersion" is deprecated. Please use the 'Get-Module' cmdlet instead.

PowerCLI Version
----------------
   VMware.PowerCLI 12.7.0 build 20091289
---------------
Component Versions
---------------
   VMware Common PowerCLI Component 12.7 build 20067789
   VMware Cis Core PowerCLI Component PowerCLI Component 12.6 build 19601368
   VMware VimAutomation VICore Commands PowerCLI Component PowerCLI Component 12.7 build 20091293
   VMware VimAutomation Storage PowerCLI Component PowerCLI Component 12.7 build 20091292
   VMware VimAutomation Vds Commands PowerCLI Component PowerCLI Component 12.7 build 20091295
   VMware VimAutomation Cloud PowerCLI Component PowerCLI Component 12.0 build 15940183 


PS C:\Users\sreejesh> Remove-Module -Name VMware.PowerCLI -Force
PS C:\Users\sreejesh> Install-Module -Name VMware.PowerCLI 

PS C:\Users\sreejesh> Get-PowerCLIVersion

PowerCLI Version
----------------
   VMware.VimAutomation.Core 13.0.0 build 20797821
---------------
Component Versions
---------------
   VMware Common PowerCLI Component 13.0 build 20797081
   VMware Cis Core PowerCLI Component PowerCLI Component 13.0 build 20797636
   VMware VimAutomation VICore Commands PowerCLI Component PowerCLI Component 13.0 build 20797821

How to create NSX-T Routed network in VCD for Tanzu Kubernetes Grid (TKG) clusters?

Please find the steps for configuring the Network in VCD for deploying TKG clusters.

Add the public IP to the Static IP Pool of T0 GW

  • Login to VCD Provider portal.
  • Navigate to Resources > Cloud Resources > Tier-0 Gateways.
  • Select the T0 Gateway.
  • Select ‘Network Specification’
  • Edit
  • Add the Public IP(s) to the ‘Static IP Pools’

Create Edge Gateway (T1 Router)

  • Login to VCD Provider portal.
  • Navigate to Resources > Cloud Resources. > Edge Gateways
  • Select New
  • Select the Org VDC and click Next
  • Provide a name for the Edge.
  • Select the appropriate T0 Gateway
  • Choose the appropriate Edge Cluster option for your environment.
  • Assign the Public IP for SNAT as Primary IP
  • Cleck Next review the settings and click Finish.

Create Organization Network

  • From provider portal select the Test organization.
  • Navigate to Networking > Networks.
  • Click New
  • Select Org VDC
  • Select Network Type ‘Routed
  • Select the Edge Gateway (T1)
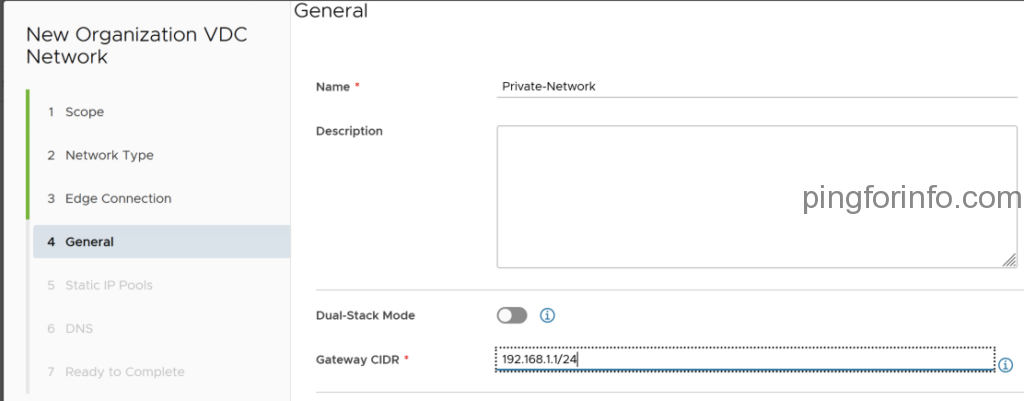
  • Provide the Name and Gateway CIDR
  • Provide the DNS server accessible from the Org Network created. The DNS server should be able to resolve the FQDNS in the public domain/internet.
  • Click Next, review the settings and click on Finish.

Create SNAT

  • From provider portal select the Test organization.
  • Navigate to Networking > Edge Gateways
  • Select the Edge Gateway (T1)
  • Navigate to Services > NAT
  • Click New
  • Provide the details as mentioned in the screenshot.

Modify default Firewall rule

  • From provider portal select the Test organization.
  • Navigate to Networking > Edge Gateways
  • Select the Edge Gateway (T1)
  • Navigate to Services > Firewall
  • Select ‘Edit Rules’
  • Select the ‘default_rule’
  • Edit
  • Select Allow as Action.

How to run VMware Container Service Extension (CSE) as Linux Service?

After installing CSE please follow the steps below to run it as a service.

Create cse.sh file

Create cse.service file. You can copy the following code or create new one based on following link.
container-service-extension/cse.sh at master · vmware/container-service-extension (github.com)

# vi /opt/vmware/cse/cse.sh
#!/usr/bin/env bash
export CSE_CONFIG=/opt/vmware/cse/encrypted-config.yaml
export CSE_CONFIG_PASSWORD=<passwd>
cse run

Copy encrypted-config.yaml to /opt/vmware/cse directory.

Change the file permission

chmod +x /opt/vmware/cse/cse.sh

Create cse.service file

Create cse.service file. You can copy the following code or create new one based on following link.
container-service-extension/cse.service at master · vmware/container-service-extension (github.com)

vi /etc/systemd/system/cse.service
[Unit]
Description=Container Service Extension for VMware Cloud Director

[Service]
ExecStart=/opt/vmware/cse/cse.sh
User=root
WorkingDirectory=/opt/vmware/cse
Type=simple
Restart=always

[Install]
WantedBy=default.target

Enable and start the service

# systemctl enable cse.service
# systemctl start cse.service

Check the service status

# systemctl status cse.service
  cse.service - Container Service Extension for VMware Cloud Director
   Loaded: loaded (/etc/systemd/system/cse.service; enabled; vendor preset: disabled)
   Active: active (running) since Wed 2021-11-24 14:43:56 +01; 1min 9s ago
 Main PID: 770 (bash)
   CGroup: /system.slice/cse.service
           ├─770 bash /opt/vmware/cse/cse.sh
           └─775 /usr/local/bin/python3.7 /usr/local/bin/cse run

Nov 24 14:44:06 cse01.lab.com cse.sh[770]: Validating CSE installation according to config file
Nov 24 14:44:06  cse.sh[770]: MQTT extension and API filters found
Nov 24 14:44:06 cse01.lab.com cse.sh[770]: Found catalog 'cse-site1-k8s'
Nov 24 14:44:06 cse01.lab.com  cse.sh[770]: CSE installation is valid
Nov 24 14:44:06 cse01.lab.com cse.sh[770]: Started thread 'MessageConsumer' (140229531580160)
Nov 24 14:44:06 cse01.lab.com l cse.sh[770]: Started thread 'ConsumerWatchdog' (140229523187456)
Nov 24 14:44:06 cse01.lab.com  cse.sh[770]: Container Service Extension for vCloud Director
Nov 24 14:44:06 cse01.lab.com  cse.sh[770]: Server running using config file: /opt/vmware/cse/encrypted-config.yaml
Nov 24 14:44:06 cse01.lab.com  cse.sh[770]: Log files: /root/.cse-logs/cse-server-info.log, /root/.cse-logs/cse-server-debug.log
Nov 24 14:44:06 cse01.lab.com  cse.sh[770]: waiting for requests (ctrl+c to close)

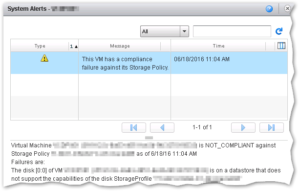
VMware vCloud : This VM has a compliance failure against its Storage Policy.

vCloud PowerCLI


Issue :

VMs in vCloud Director displays the message : “System alert – This VM has a compliance failure against its Storage Policy.”

Symptoms :

After changing the storage profile of the VM you may observe the following error in ‘Status‘.

“System alerts – This VM has a compliance failure against its Storage Policy.”

Virtual Machine <VMName>(UUID) is NOT_COMPLIANT against Storage Policy <SP Name> as of 6/18/16 11:04 AM
Failures are:
The disk [0:0] of VM <VMName>(UUID) is on a datastore that does not support the capabilities of the disk StorageProfile <SP Name>

Resolution :

To reset the alarm in the vCloud Director.

Option 1:

  1. Click the System Alert and select ClearAll.

vcd-1


vcd-2


Option 2:

If many VMs have the same alerts then its difficult to clear one by one. In that case we can use SQL statement to clear all alerts.

  1. Log in to the database with Admin credentials using Microsoft SQL Management Studio.
  2. Run this SQL statement to display all virtual machines with the system alert:
    #
    select * from object_condition where condition = 'vmStorageProfileComplianceFailed'
    #

    vcd-3

  3. Run this update statement to clear the alert in the vCD UI:
    #
    update object_condition set ignore = 1 where condition = 'vmStorageProfileComplianceFailed'
    #


PowerCLI script to Set Perennial reservation on RDM LUNs in a Cluster

Please find the Powercli script for configuring Perennial reservation on all RDM luns in a ESXi Cluster. Please change the value for following variables before you execute the script.

$vcenter = “vCenter.vmtest.com”
$dCenter = “123456”
$cluster = “Production Hypervisor”

This is the flow of script execution.

1. Get the list of RDM LUNs from the cluster.
2. Check the current perennial reservation status of the RDM. If it’s TRUE, no changes will be applied.
3. If the status is FALSE, the perennial reservation will be set on the LUN.
4. Script will query the latest status and the status will be displayed.

The result, after executing the script, looks something like this.

perinnial reservation


# This script will set the parameter Perennially Reservations to True on RDM Luns in a cluster
#$vcenter = #"vCenter Name "
#$dCenter = #"Datacenter Name"
#$cluster = #"Cluster Name"

$vcenter = "vCenter.vmtest.com"
$dCenter = "123456"
$cluster = "Production Hypervisor"

#-------------------------------------------------------------------------

# Do not modify bellow script
#-------------------------------------------------------------------------

#Add-PSSnapIn VMware* -ErrorAction SilentlyContinue

$connected = Connect-VIServer -Server $vcenter | Out-Null

$clusterInfo = Get-Datacenter -Name $dCenter | get-cluster $cluster
$vmHosts = $clusterInfo | get-vmhost | select -ExpandProperty Name
$RDMNAAs = $clusterInfo | Get-VM | Get-HardDisk -DiskType "RawPhysical","RawVirtual" | Select -ExpandProperty ScsiCanonicalName -Unique

foreach ($vmhost in $vmHosts) {
$myesxcli = Get-EsxCli -VMHost $vmhost

foreach ($naa in $RDMNAAs) {

$diskinfo = $myesxcli.storage.core.device.list("$naa") | Select -ExpandProperty IsPerenniallyReserved
$vmhost + " " + $naa + " " + "IsPerenniallyReserved= " + $diskinfo
if($diskinfo -eq "false")
{
write-host "Configuring Perennial Reservation for LUN $naa......."
$myesxcli.storage.core.device.setconfig($false,$naa,$true)
$diskinfo = $myesxcli.storage.core.device.list("$naa") | Select -ExpandProperty IsPerenniallyReserved
$vmhost + " " + $naa + " " + "IsPerenniallyReserved= " + $diskinfo
}
write-host "----------------------------------------------------------------------------------------------"
}
}

Disconnect-VIServer $vcenter -confirm:$false | Out-Null

Configure Virtual Machine-FEX with Cisco VIC and Nexus 5K – Part 3

In this final part we discuss on the configuration that needs to be done on vCenter to enable VMFEX.

vmware-ciscoFirst step is to install vCenter and login to vCenter as administrator user. Now create a Datacenter where you want to add the hosts which will participate in VM-FEX. In this document, I use the datacenter name DC1.

Configure SVS connection to vCenter

Once the DC is created in vCenter, login to Nexus 5000 Switch using its management IP.

Before starting this configuration, make sure that the Nexus switch management ip is reachable by vCenter server. Following is an example on SVS connection creation.

  1. 1.     configure
  2. 2.     svs connection <svs connection name>
  3. 3.     protocol vmware-vim
  4. 4.     vmware dvs datacenter-name <vCenter datacenter name>
  5. 5.     dvs-name <vCenter DVS name>
  6. 6.     remote ip address <vCenterServer IP> port <vCenter Port> vrf management
  7. 7.     install certificate default
  8. 8.     extention-key cisco_nexus_fex

Example screenshot:
Continue reading

Configure Virtual Machine-FEX with Cisco VIC and Nexus 5K – Part 2

Cisco-VMFEXOnce the configuration on Cisco VIC adapter is done, we need to do certain configuration settings on Nexus switch to enable VM-FEX. In this section we discuss more on the configuration settings that needs to be done specifically on on Nexus 5000 Series switch to enable VM-FEX. We also discuss on settings that needs to be done on ESXi to enable VMFEX.

A VM-FEX license is required for Cisco Nexus device. The license package name is VMFEX_ FEATURE_PKG. Incase if you are just interested in experimenting with this cool feature, a grace period of 120 days starts when you first configure this feature.

We have to do the following configuration on Nexus 5000 switch:

  1. Enable VM-FEX and other related services
  2. Define port profiles for dynamic Virtual Machine ports
  3. Enable vntag on applicable ports
  4. Install Cisco_nexus_vmfex plugin in vCenter
  5. Configure SVS connection to vCenter
  6. Activate and verify the SVS connection

Continue reading

Configure Virtual Machine-FEX with Cisco VIC and Nexus 5K – Part 1

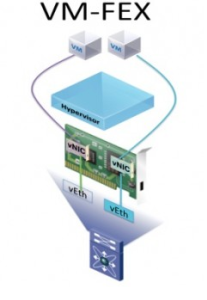
Sick and tired of managing physical and virtual network for your data center from different management interfaces? VMFEX is Cisco’s answer to your problem. Cisco Virtual Machine Fabric Extender (VM-FEX) technology extends cisco’s fabric extender technology to virtual machines. In simpler words, with VMFEX you will be able to manage both physical and virtual network ports from your Nexus 5000.
 
vmware-ciscoThe objective of this article is to help users setup a VMFEX solution very easily in their virtualized environment with Cisco Rack Servers. This document has been divided into 3 parts.

Part 1: Introduction and VIC configurations

Part2: Nexus 5000 configuration

Part 3: ESXi and vCenter configuration
Continue reading